In the interest of enabling source control and potentially automation, the deployment is conducted using PowerShell commands. In this example I am using Azure CloudShell, for manual and exploratory activities it is handy as it is secure, includes all required modules, removes any authentication faff.
You can create session hosts and register them to a host pool in a single end-to-end process with the Azure Virtual Desktop service using the Azure portal or an ARM template. You can find some example ARM templates in our GitHub repo
Registration Key: When you add session hosts to a host pool, first you’ll need to generate a registration key. A registration key needs to be generated per host pool and it authorizes session hosts to join that host pool. It’s only valid for the duration you specify. (maximum of 30 days validity), see: Add session hosts to a host pool – Azure Virtual Desktop | Microsoft Learn
Deployment Procedure
When using Azure CLI or Azure PowerShell you’ll need to create the virtual machines outside of Azure Virtual Desktop, then add them as session hosts to a host pool separately.
When you add session hosts to a host pool, first you’ll need to generate a registration key. A registration key needs to be generated per host pool and it authorizes session hosts to join that host pool. It’s only valid for the duration you specify. If an existing registration key has expired, you can also use these steps to generate a new key.
Create and register session hosts with the Azure Virtual Desktop service
In the search bar, enter Azure Virtual Desktop and select the matching service entry.
Select Host pools, then select the name of the host pool you want to add session hosts to.
On the host pool overview, select Session hosts, then select + Add.
The Basics tab will be greyed out because you’re using the existing host pool. Select Next: Virtual Machines.
On the Virtual machines tab, complete the following information:
(this is for our use case and assumes you followed Part 1, of course customise this as appropriate)
Name prefix: SAW
Availability options: No infrastructure redundancy required
Security Type: Trusted launch virtual machines
Enable secure boot: True
Enable vTPM: True
Integrity monitoring: True
Image: Latest Windows 11 Enterprise multi-session
If we select Personal instead of Pooled in Part 1, we would have non-Enterprise options here…
Virtual machine size, Number of VMs, OS disk type
Use case dependent with no impact on procedure/security
Boot diagnostics: Enabled with managed storage account
Network and security
Virtual Network: SAWVnet
Subnet:SAWSubNet
Network security group type: Basic
Public inbound ports: No
Domain to join
Select which directory you would like to join: Microsoft Entra ID
Enroll VM with Intune: Yes
Virtual machine administrator account
Required for Azure to provision the VM, once it joins Entra and Intune your Configuration Profile should remove the local administrator
Custom configuration
Custom configuration script url: None for now…
Tags?
Suggest adding ‘ResougeTag:AzureSAW’ for now… tags can be handy
Download a template for automation, suggest doing this as a default behaviour
Create!
Post Host Deployment
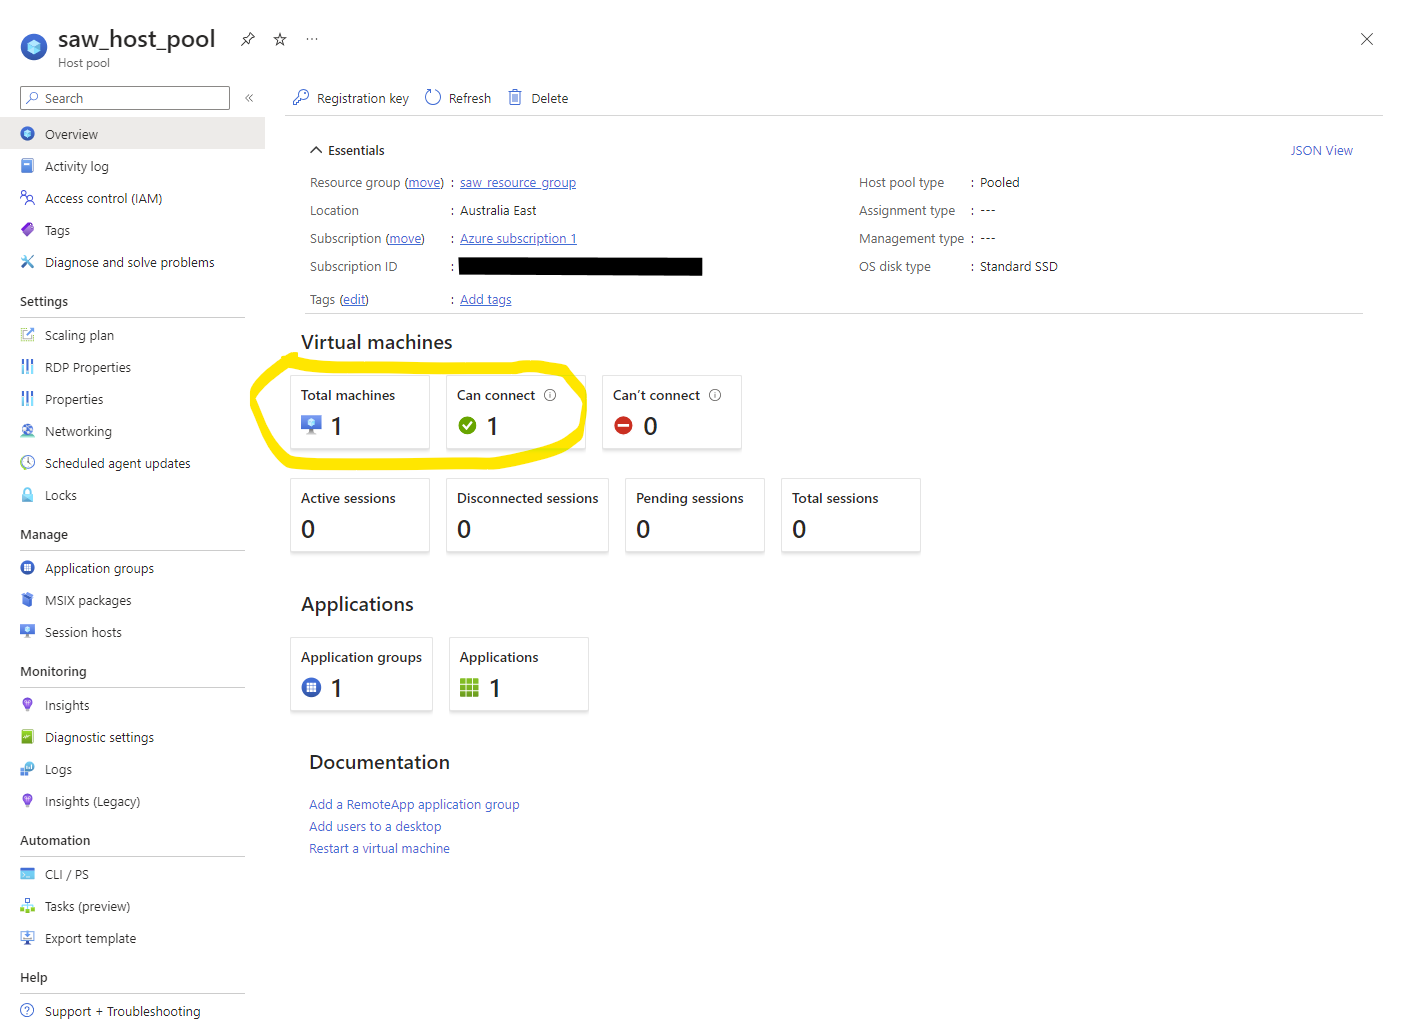
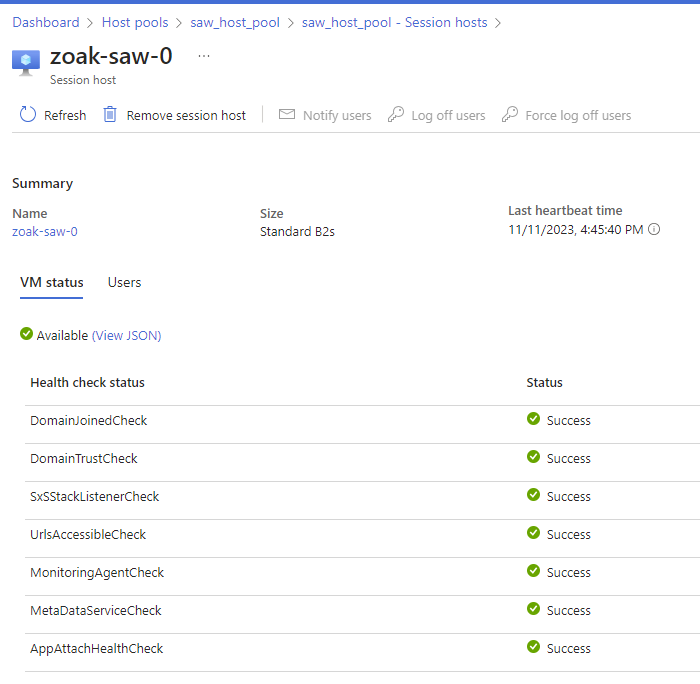
After launching your first Session Host, Azure will take several (20?!) mins to deploy the session host and add it to the Host Pool. You can verify this was successful via Host pools – Microsoft Azure:
NOTE:This is just for generating a Registration key, as we want Microsoft Entra joined session hosts, we can only create them via the Azure Portal as per: Add session hosts to a host pool | Microsoft Learn
Assuming your session host deployed successfully and your user has been added the $SAWUserGroup you can now access the SAW. As we are using the Azure Virtual Desktop Service:
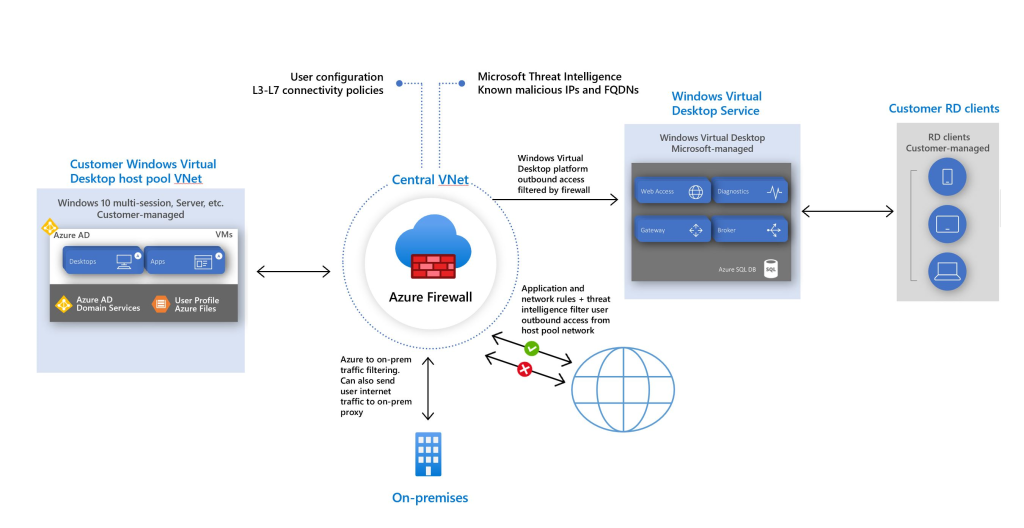
Microsoft manages the infrastructure and brokering components, enterprise customers manage their own desktop host virtual machines (VMs), data, and clients.
Azure Firewall includes a built-in rule collection for infrastructure FQDNs that are allowed by default. These FQDNs are specific for the platform and can’t be used for other purposes. For more information, see Infrastructure FQDNs.
Your session hosts and users need to be able to connect to the Azure Virtual Desktop service. These connections also use TCP on port 443 to a specific list of URLs. For more information, see Required URL list. You must make sure these URLs aren’t blocked by network filtering or a firewall in order for your deployment to work properly and be supported. If your users need to access Microsoft 365, make sure your session hosts can connect to Microsoft 365 endpoints.
Noting Azure states that for ‘production’ deployments, a hub and spoke model is recommended, where the firewall is in its own VNet.
For our use case, I don’t believe the hub and spoke model will provide any benefit regarding security or otherwise.
Create a Vnet and add FWsubnet + SAWsubnet
NOTE: The AzureFWSubnet must be a /26
Create a Public IP Address for the Azure FW and deploy the firewall
Create a route table and associate routes to SAW subnet ensuring SAW traffic is routed via the Azure Firewall
Create rules for outbound internet connectivity, some MS doc still has commands for deploying Application and Network firewall rules directly on the Azure Firewall despite the Azure Well-Architected Framework review – Azure Firewall | Microsoft Learn stating that Azure Firewall Manager and Policies should be used
… so the PowerShell script below has been updated to create an Azure Firewall Policy instead of assigning rules directly to the firewall
PowerShell
Assumes using an appropriately authenticated user with sufficient privileges
We have numerous clients and our own systems that require:
Access only from appropriately hardened and monitored hosts
Inbound and outbound network security including the ability to ‘AllowList’ and ‘BlockList’ based on IPs/URLs/Hostnames/other ‘NGFW‘ methods… although this can be achieved with host-based only controls… does not seems like a very layered defence.
Idempotent deployment solution (deployment code can be run regularly and if no changes to code, no changes to deployment)
PowerShell is not ideal for doing idempotency proper… but it can, will see how I go for time.
In the interest of enabling source control and potentially automation, the deployment is conducted using PowerShell commands. In this example I am using Azure CloudShell, for manual and exploratory activities it is handy as it is secure, includes all required modules, removes any authentication faff.
At this stage I am not sure how much additional protection / value adding Azure Firewall to the environment will add… will add it for now and find out! Microsoft’s doc doesn’t make the benefits very clear for me:
A host pool is a collection of Azure virtual machines that register to Azure Virtual Desktop as session hosts. These virtual machines run in your virtual network and are subject to the virtual network security controls. They need outbound Internet access to the Azure Virtual Desktop service to operate properly and might also need outbound Internet access for end users. Azure Firewall can help you lock down your environment and filter outbound traffic. (Use Azure Firewall to protect Azure Virtual Desktop | Microsoft Learn)
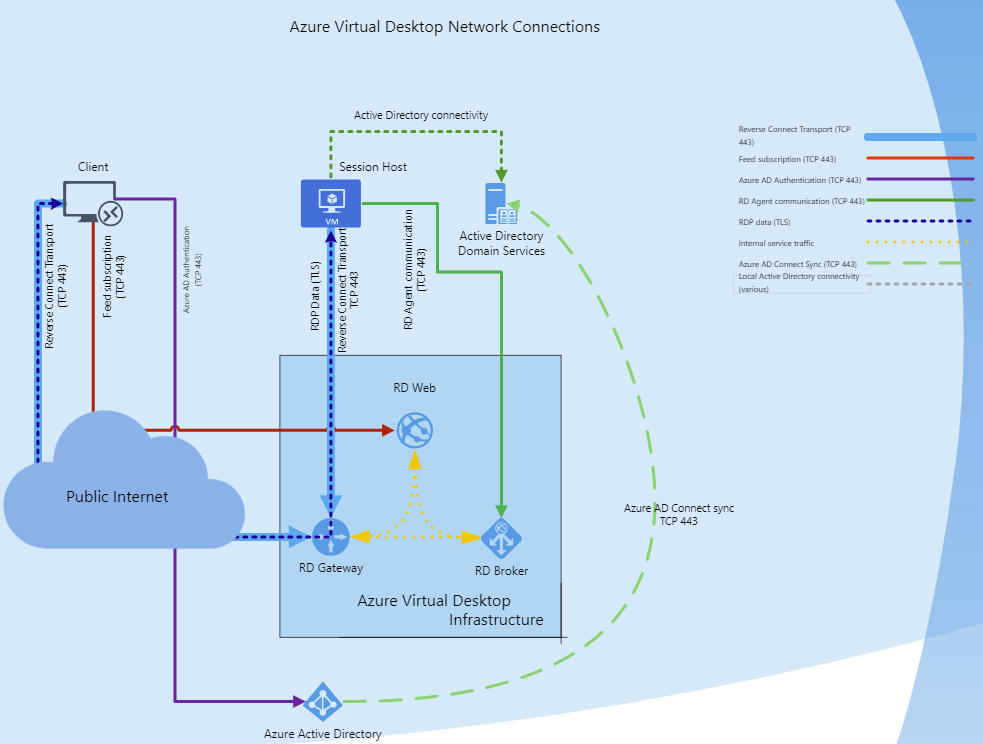
The diagram below shows a suggested architecture, going to try avoid getting stuck without a required component later and stay somewhat close to this. Though it should be noted that a potentially valid architecture is just a SAWVnet as inbound connectivity is managed by Azure (via the AVD Instructure: Users connecting to Azure Virtual Desktop securely establish a reverse connection to the service, which means you don’t need to open any inbound ports. (Azure Virtual Desktop | Microsoft Learn)
Resource groups: Logical containers that you use to group related resources in a subscription. Each resource can exist in only one resource group. Resource groups allow for more granular grouping within a subscription. They’re commonly used to represent a collection of assets that are required to support a workload, application, or specific function within a subscription.
Host pools: A host pool is a collection of Azure virtual machines that register to Azure Virtual Desktop as session hosts when you run the Azure Virtual Desktop agent. All session host virtual machines in a host pool should be sourced from the same image for a consistent user experience. You control the resources published to users through application groups. A host pool can be one of two types:
Personal, where each session host is assigned to an individual user. Personal host pools provide dedicated desktops to end-users that optimize environments for performance and data separation.
Pooled, where user sessions can be load balanced to any session host in the host pool. There can be multiple different users on a single session host at the same time. Pooled host pools provide a shared remote experience to end-users, which ensures lower costs and greater efficiency.
Application groups: An application group is a logical grouping of applications installed on session hosts in the host pool. An application group can be one of two types:
RemoteApp, where users access the applications you individually select and publish to the application group. Available with pooled host pools only.
Desktop, where users access the full desktop. Available with pooled or personal host pools.
NOTE: We don’t support assigning both the RemoteApp and desktop application groups in a single host pool to the same user.
Workspaces: logical grouping of application groups in Azure Virtual Desktop. Each Azure Virtual Desktop application group must be associated with a workspace for users to see the desktops and applications published to them.
Use the New-AzWvdHostPool cmdlet with the following examples to create a host pool. More parameters are available; for more information, see the New-AzWvdHostPool PowerShell reference.
Personal, where each session host is assigned to an individual user. Personal host pools provide dedicated desktops to end-users that optimize environments for performance and data separation.
Pooled, where user sessions can be load balanced to any session host in the host pool. There can be multiple different users on a single session host at the same time. Pooled host pools provide a shared remote experience to end-users, which ensures lower costs and greater efficiency.