# see: https://openvpn.net/as-docs/docker.html#run-the-docker-container
docker pull openvpn/openvpn-as
docker run -d \
–name=openvpn-as –cap-add=NET_ADMIN \
-p 943:943 -p 4443:4443 -p 1194:1194/udp \
-v /root/openvpn-server:/openvpn \
openvpn/openvpn-as
# Modify ports and hostname as appropriate cd /root/openvpn-server/etc
vim ./config-local.json docker restart openvpn/openvpn-as
# Get Temp password
docker logs openvpn-as | grep -i “Auto-generated pass”
# Scroll to find the line, Auto-generated pass = “[password]”. Setting in db..
Configure your OpenVPN services
# Use the generated password sign in to the Admin Web UI.
# username: openvpn
https://[my_hostname_or_pubip].com:943/admin/
# Check the hostname setting.. put in yourhostname…
https://[my_hostname_or_pubip]:943/admin/network_settings
# Stop the VPN services and start to ensure changes loaded and persistent:
https://[my_hostname_or_pubip]:943/admin/status_overview
# Create a user and a new Token Url for the user to import the profile
Windows Client set up
# Install with winget:
winget install -e –id OpenVPNTechnologies.OpenVPNConnect
# Once installed, get the token which will be something like:
openvpn://https://[my_hostname_or_pubip]:043/ConnectClient/[token].ovpn
# Put in browser and should open up the OpenVPN client and import the profile, and connect
CloudShell is very handy for working with Azure and M365, it removes the issues of PowerShell versioning/modules/authentication and is hosted within you Azure infrastructure boundary, providing some mitigation to privileged access and administrator device risks.
When implementing an Azure Virtual Secure Administration Workstation solution I ended up wasting a bunch of time editing files via the Azure CloudShell instead of locally, this resulted in silly typos (due to lack of syntax highlights, error correction and all the other goodness of an IDE like Visual Studio Code.
To solve this issue I want to mount my CloudShell persistent storage locally, enabling me to edit files locally and immediately test in CloudShell, without pushing/pulling and inevitable conflicts between local and remote.
Turns out that this is much easier than expected using
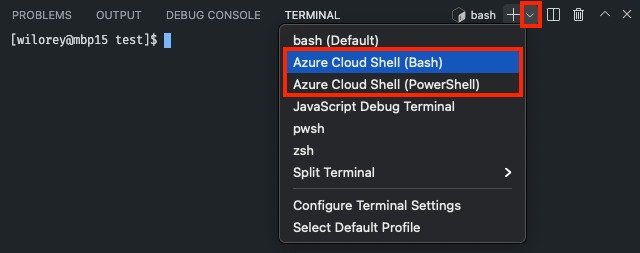
Open Azure Cloud Shell (PowerShell) in VSCode Terminal:
CTRL+SHIFT+P > Terminal: Create New Terminal (With Profile)
If you don’t have NodeJS installed the extension will ask you to install (providing button to click..) the link the extension provided was to an older version of NodeJS and not latest… suggest just using: Node.js (nodejs.org)
Instead I am just using the Azure Extensions Resource Explorer (SHIFT+ALT+A), navigating to the fileshare and selecting files (which opens them in VScode local window)
NOTE: The CloudDrive is not your enitire CloudShell homedir, its ~/clouddrive
In the interest of enabling source control and potentially automation, the deployment is conducted using PowerShell commands. In this example I am using Azure CloudShell, for manual and exploratory activities it is handy as it is secure, includes all required modules, removes any authentication faff.
You can create session hosts and register them to a host pool in a single end-to-end process with the Azure Virtual Desktop service using the Azure portal or an ARM template. You can find some example ARM templates in our GitHub repo
Registration Key: When you add session hosts to a host pool, first you’ll need to generate a registration key. A registration key needs to be generated per host pool and it authorizes session hosts to join that host pool. It’s only valid for the duration you specify. (maximum of 30 days validity), see: Add session hosts to a host pool – Azure Virtual Desktop | Microsoft Learn
Deployment Procedure
When using Azure CLI or Azure PowerShell you’ll need to create the virtual machines outside of Azure Virtual Desktop, then add them as session hosts to a host pool separately.
When you add session hosts to a host pool, first you’ll need to generate a registration key. A registration key needs to be generated per host pool and it authorizes session hosts to join that host pool. It’s only valid for the duration you specify. If an existing registration key has expired, you can also use these steps to generate a new key.
Create and register session hosts with the Azure Virtual Desktop service
In the search bar, enter Azure Virtual Desktop and select the matching service entry.
Select Host pools, then select the name of the host pool you want to add session hosts to.
On the host pool overview, select Session hosts, then select + Add.
The Basics tab will be greyed out because you’re using the existing host pool. Select Next: Virtual Machines.
On the Virtual machines tab, complete the following information:
(this is for our use case and assumes you followed Part 1, of course customise this as appropriate)
Name prefix: SAW
Availability options: No infrastructure redundancy required
Security Type: Trusted launch virtual machines
Enable secure boot: True
Enable vTPM: True
Integrity monitoring: True
Image: Latest Windows 11 Enterprise multi-session
If we select Personal instead of Pooled in Part 1, we would have non-Enterprise options here…
Virtual machine size, Number of VMs, OS disk type
Use case dependent with no impact on procedure/security
Boot diagnostics: Enabled with managed storage account
Network and security
Virtual Network: SAWVnet
Subnet:SAWSubNet
Network security group type: Basic
Public inbound ports: No
Domain to join
Select which directory you would like to join: Microsoft Entra ID
Enroll VM with Intune: Yes
Virtual machine administrator account
Required for Azure to provision the VM, once it joins Entra and Intune your Configuration Profile should remove the local administrator
Custom configuration
Custom configuration script url: None for now…
Tags?
Suggest adding ‘ResougeTag:AzureSAW’ for now… tags can be handy
Download a template for automation, suggest doing this as a default behaviour
Create!
Post Host Deployment
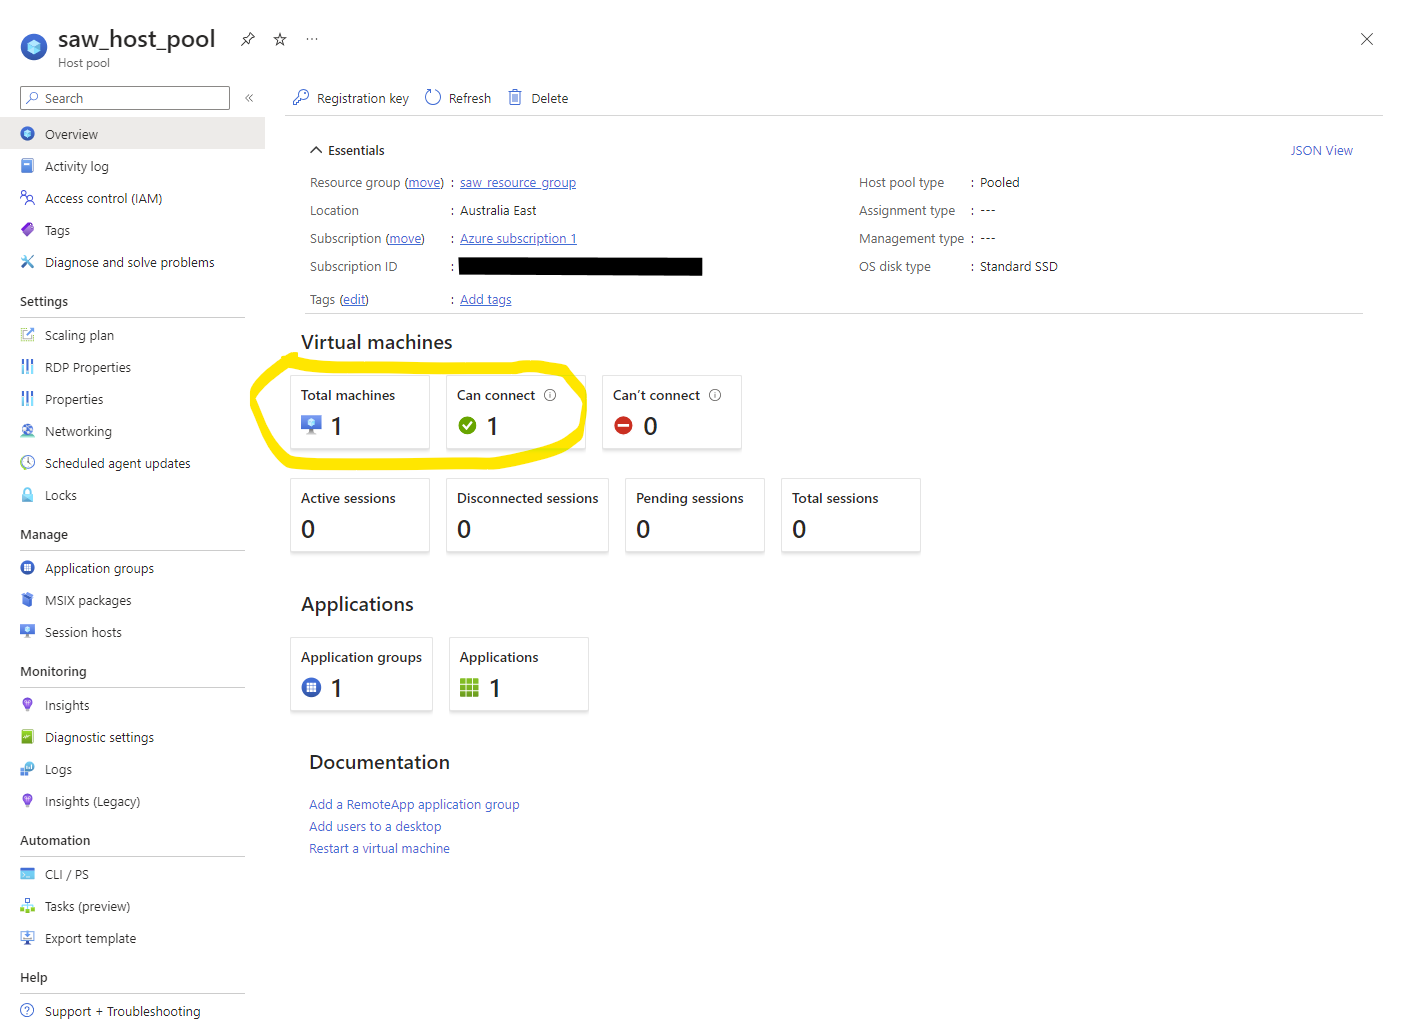
After launching your first Session Host, Azure will take several (20?!) mins to deploy the session host and add it to the Host Pool. You can verify this was successful via Host pools – Microsoft Azure:
NOTE:This is just for generating a Registration key, as we want Microsoft Entra joined session hosts, we can only create them via the Azure Portal as per: Add session hosts to a host pool | Microsoft Learn
Assuming your session host deployed successfully and your user has been added the $SAWUserGroup you can now access the SAW. As we are using the Azure Virtual Desktop Service:
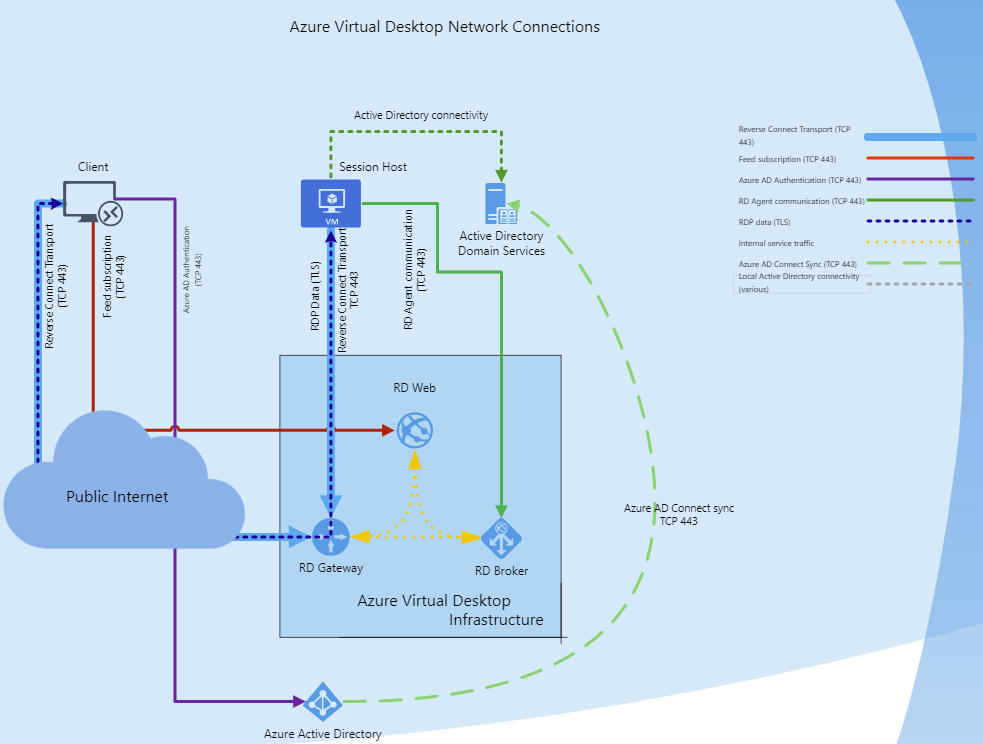
Microsoft manages the infrastructure and brokering components, enterprise customers manage their own desktop host virtual machines (VMs), data, and clients.
Azure Firewall includes a built-in rule collection for infrastructure FQDNs that are allowed by default. These FQDNs are specific for the platform and can’t be used for other purposes. For more information, see Infrastructure FQDNs.
Your session hosts and users need to be able to connect to the Azure Virtual Desktop service. These connections also use TCP on port 443 to a specific list of URLs. For more information, see Required URL list. You must make sure these URLs aren’t blocked by network filtering or a firewall in order for your deployment to work properly and be supported. If your users need to access Microsoft 365, make sure your session hosts can connect to Microsoft 365 endpoints.
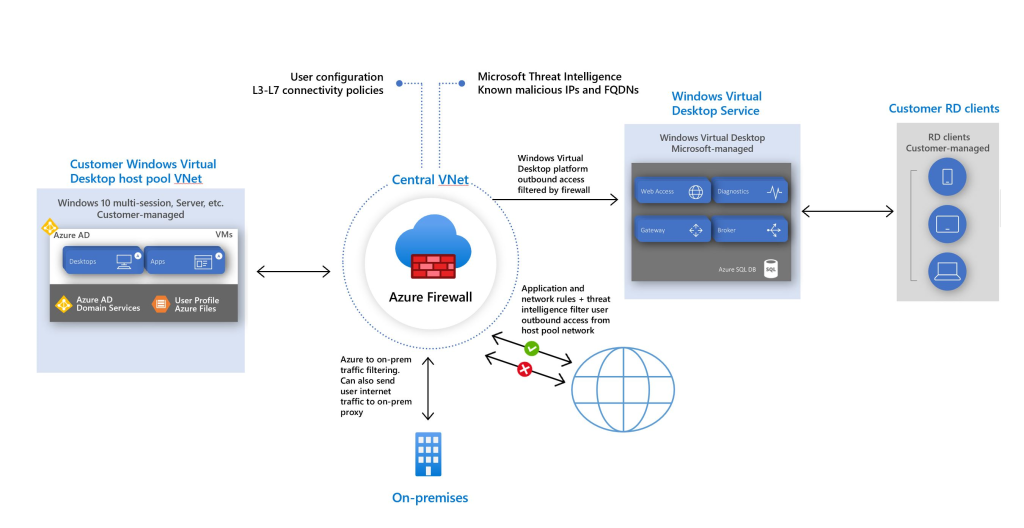
Noting Azure states that for ‘production’ deployments, a hub and spoke model is recommended, where the firewall is in its own VNet.
For our use case, I don’t believe the hub and spoke model will provide any benefit regarding security or otherwise.
Create a Vnet and add FWsubnet + SAWsubnet
NOTE: The AzureFWSubnet must be a /26
Create a Public IP Address for the Azure FW and deploy the firewall
Create a route table and associate routes to SAW subnet ensuring SAW traffic is routed via the Azure Firewall
Create rules for outbound internet connectivity, some MS doc still has commands for deploying Application and Network firewall rules directly on the Azure Firewall despite the Azure Well-Architected Framework review – Azure Firewall | Microsoft Learn stating that Azure Firewall Manager and Policies should be used
… so the PowerShell script below has been updated to create an Azure Firewall Policy instead of assigning rules directly to the firewall
PowerShell
Assumes using an appropriately authenticated user with sufficient privileges
We have numerous clients and our own systems that require:
Access only from appropriately hardened and monitored hosts
Inbound and outbound network security including the ability to ‘AllowList’ and ‘BlockList’ based on IPs/URLs/Hostnames/other ‘NGFW‘ methods… although this can be achieved with host-based only controls… does not seems like a very layered defence.
Idempotent deployment solution (deployment code can be run regularly and if no changes to code, no changes to deployment)
PowerShell is not ideal for doing idempotency proper… but it can, will see how I go for time.
In the interest of enabling source control and potentially automation, the deployment is conducted using PowerShell commands. In this example I am using Azure CloudShell, for manual and exploratory activities it is handy as it is secure, includes all required modules, removes any authentication faff.
At this stage I am not sure how much additional protection / value adding Azure Firewall to the environment will add… will add it for now and find out! Microsoft’s doc doesn’t make the benefits very clear for me:
A host pool is a collection of Azure virtual machines that register to Azure Virtual Desktop as session hosts. These virtual machines run in your virtual network and are subject to the virtual network security controls. They need outbound Internet access to the Azure Virtual Desktop service to operate properly and might also need outbound Internet access for end users. Azure Firewall can help you lock down your environment and filter outbound traffic. (Use Azure Firewall to protect Azure Virtual Desktop | Microsoft Learn)
The diagram below shows a suggested architecture, going to try avoid getting stuck without a required component later and stay somewhat close to this. Though it should be noted that a potentially valid architecture is just a SAWVnet as inbound connectivity is managed by Azure (via the AVD Instructure: Users connecting to Azure Virtual Desktop securely establish a reverse connection to the service, which means you don’t need to open any inbound ports. (Azure Virtual Desktop | Microsoft Learn)
Resource groups: Logical containers that you use to group related resources in a subscription. Each resource can exist in only one resource group. Resource groups allow for more granular grouping within a subscription. They’re commonly used to represent a collection of assets that are required to support a workload, application, or specific function within a subscription.
Host pools: A host pool is a collection of Azure virtual machines that register to Azure Virtual Desktop as session hosts when you run the Azure Virtual Desktop agent. All session host virtual machines in a host pool should be sourced from the same image for a consistent user experience. You control the resources published to users through application groups. A host pool can be one of two types:
Personal, where each session host is assigned to an individual user. Personal host pools provide dedicated desktops to end-users that optimize environments for performance and data separation.
Pooled, where user sessions can be load balanced to any session host in the host pool. There can be multiple different users on a single session host at the same time. Pooled host pools provide a shared remote experience to end-users, which ensures lower costs and greater efficiency.
Application groups: An application group is a logical grouping of applications installed on session hosts in the host pool. An application group can be one of two types:
RemoteApp, where users access the applications you individually select and publish to the application group. Available with pooled host pools only.
Desktop, where users access the full desktop. Available with pooled or personal host pools.
NOTE: We don’t support assigning both the RemoteApp and desktop application groups in a single host pool to the same user.
Workspaces: logical grouping of application groups in Azure Virtual Desktop. Each Azure Virtual Desktop application group must be associated with a workspace for users to see the desktops and applications published to them.
Use the New-AzWvdHostPool cmdlet with the following examples to create a host pool. More parameters are available; for more information, see the New-AzWvdHostPool PowerShell reference.
Personal, where each session host is assigned to an individual user. Personal host pools provide dedicated desktops to end-users that optimize environments for performance and data separation.
Pooled, where user sessions can be load balanced to any session host in the host pool. There can be multiple different users on a single session host at the same time. Pooled host pools provide a shared remote experience to end-users, which ensures lower costs and greater efficiency.
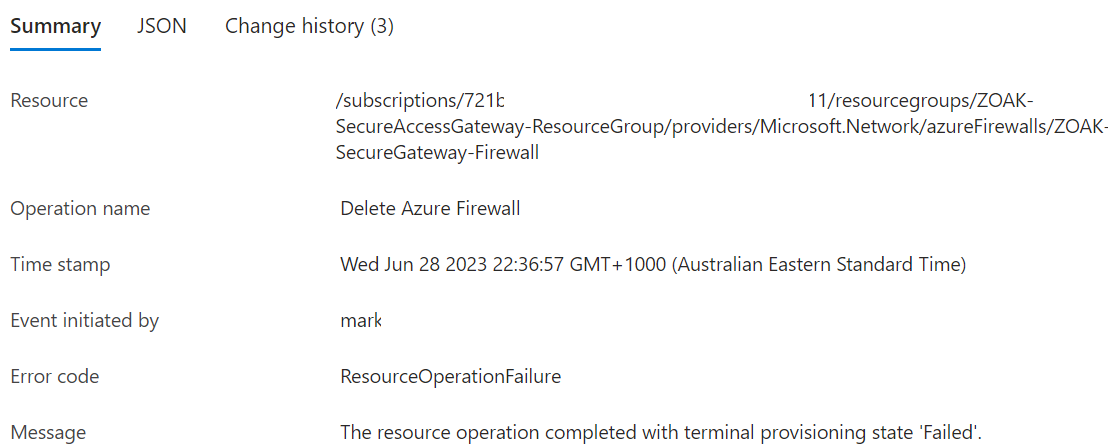
If you have removed/deleted a Firewall policy or attachment to the Azure Firewall – re-attach it, or create the policy/attachment with the same name (you will see the name in the CLI output as detailed below).
Once you have re-attached, re-created (just empty policy with same name) you can then delete the Firewall (recommended using Azure Cloud PowerShell) with command:
Obviously updating -Name and -ResourceGroup parameters.
...
Remove-AzFirewall: Long running operation failed with status 'Failed'. Additional Info:'The Resource 'Microsoft.Network/firewallPolicies/ZOAK-SecureGateway-Firewall-BasicPolicy' under resource group 'ZOAK-SecureAccessGateway-ResourceGroup' was not found. For more details please go to https://aka.ms/ARMResourceNotFoundFix'
StatusCode: 200
ReasonPhrase: OK
Status: Failed
ErrorCode: ResourceNotFound
ErrorMessage: The Resource 'Microsoft.Network/firewallPolicies/ZOAK-SecureGateway-Firewall-BasicPolicy' under resource group 'ZOAK-SecureAccessGateway-ResourceGroup' was not found. For more details please go to https://aka.ms/ARMResourceNotFoundFix
This new upgrade/downgrade capability doesn’t currently support the Azure Firewall Basic SKU (why have the ‘Change SKU’ button then??)
So… when to delete the firewall… which seemed to hang (was only looking via the UI).
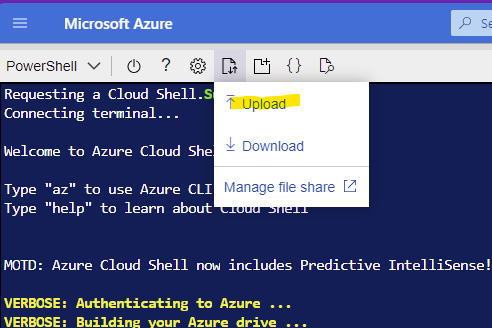
Went to use CLI from my workstation… and ran into SSL error when trying to authenticate with MFA (which I couldn’t work around quickly….) so used the Azure Cloud PowerShell which I would recommend for anyone getting frustrated (or blocked by workstation restrictions) with local PowerShell – you can upload scripts and inputs simply and there are no issue with auth, modules, versions, dependencies, etc.
Once attempting to delete via CLI I actually got a meaningful error message:
Additional Info:'The Resource 'Microsoft.Network/firewallPolicies/ZOAK-SecureGateway-Firewall-BasicPolicy' under resource group 'ZOAK-SecureAccessGateway-ResourceGroup' was not found.
That resource had already been deleted… so, re-recreate (just and empty policy) with same name… attached it, then I could delete.
Step 2: Use SQL Developer’s Database Export wizard to export the view to your desired file format
In SQLDeveloper, Tools → Database Export
Select the correct DB connection
Uncheck ‘Export DDL’
Under ‘Export Data’ change Format to CSV or XLSX (or whatever file type is desired)
Adjust file names and output dir as desired, click Next
Uncheck all except ‘Views’, Next
Ensure that you select the correct schema selected, if the schema is not the default schema for your user, click ‘more’ – select the correct schema and change type from ‘All Objects’ to ‘View’
Click ‘Lookup’ and you will see the view you created in Step 1
Select the View and hit the blue arrow to move the view into the lower box, then click next, review and Finish.. your export will now run with a status box for the task.
As I could not find an updated version of these for the new release I have made one. The repo for this, 2019 community version (specifically c2.4.1) can be found here: https://github.com/markz0r/eramba-community-docker
Follow the steps in README.md and you should be testing the new eramba in no time.
Mar, 2020: Updated for community edition 2.8.1
Thanks to the team at Eramba for making the tool available for all!
We have a web application that has been running on AWS for several years. As application load balancers and the AWS WAF service was not available, we utilised and external classic ELB point to a pool of EC2 instances running mod_security as our WAF solution. Mod_security was using the OWASP Mod_security core rule set.
Now that Application Load Balancers and AWS WAFs are available, we would like to remove the CPU bottleneck which stems from using EC2 instances with mod security as the current WAF.
Step 1 – Base-lining performance with EC2 WAF solution.
The baseline was completed using https://app.loadimpact.com where we ran 1000 concurrent users, with immediate rampup. On our test with 2 x m5.large EC2 instances as the WAF, the WAFs became CPU pinned within 2mins 30 seconds.
This test was repeated with the EC2 WAFs removed from the chain and we averaged 61ms across the loadimpact test with 1000 users. So – now we need to implement the AWS WAF solution so that can be compared.
Step 2 – Create an ‘equivalent’ rule-set and start using AWS WAF service.
We used terraform for this environment so the CloudFormation web ACL and rules are not being used and I will start be testing out the terraform code upload by traveloka. After having a look at the code in more detail I decided I need to get a better understanding of the terraform modules (and the AWS service) so I will write some terraform code from scratch.
So – getting started with the AWS WAF documentation we read, ‘define your conditions, combine your conditions into rules, and combine the rules into a web ACL.
Conditions: Request strings, source IPs, Country/Geo location of request IP, Length of specified parts of the requests, SQL code (SQL injection), header values (i.e.: User-Agent). Conditions can be multiple values and regex.
Rules: Combinations of conditions along with an ACTION (allow/block/count). There are Regular rules whereby conditions can be and/or chained. Rate-based rules where by the addition of a rate-based condition can be added.
Web ACLs: Whereby the action for rules are defined. Multiple rules can have the same action, thus be grouped in the same ACL. The WAF uses Web ACLs to assess requests against rules in the order which the rules are added to the ACL, whichever/if any rules is matched first defines which action is taken.
Starting simple: To get started I will implement a rate limiting rule which limits 5 requests per minute to our login page from a specified IP along with the basic OWASP rules from terraform code upload by traveloka . Below is our main.tf with the aws_waf_owasp_top_10_rules created for this test.
main.tf which references our newly created aws_waf_owasp_top_10_rules module
ab -v 3 -n 2000 -c 100 https://<my_target.com.au>/login > ab_2000_100_waf_test.log
This command logs request headers (-v 3 for verbosity of output), makes 2000 requests (-n 2000) and conducts those request 100 concurrently (-c 100). I can then see failed requests by tailing the output:
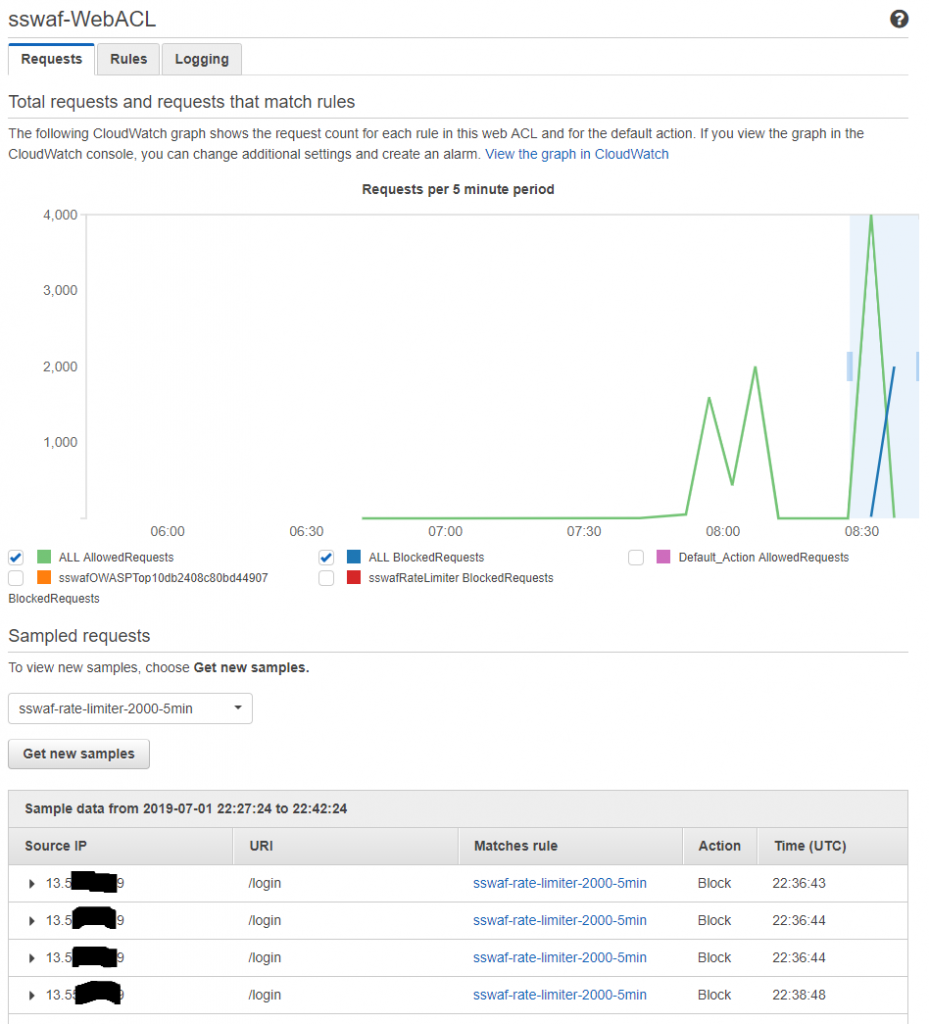
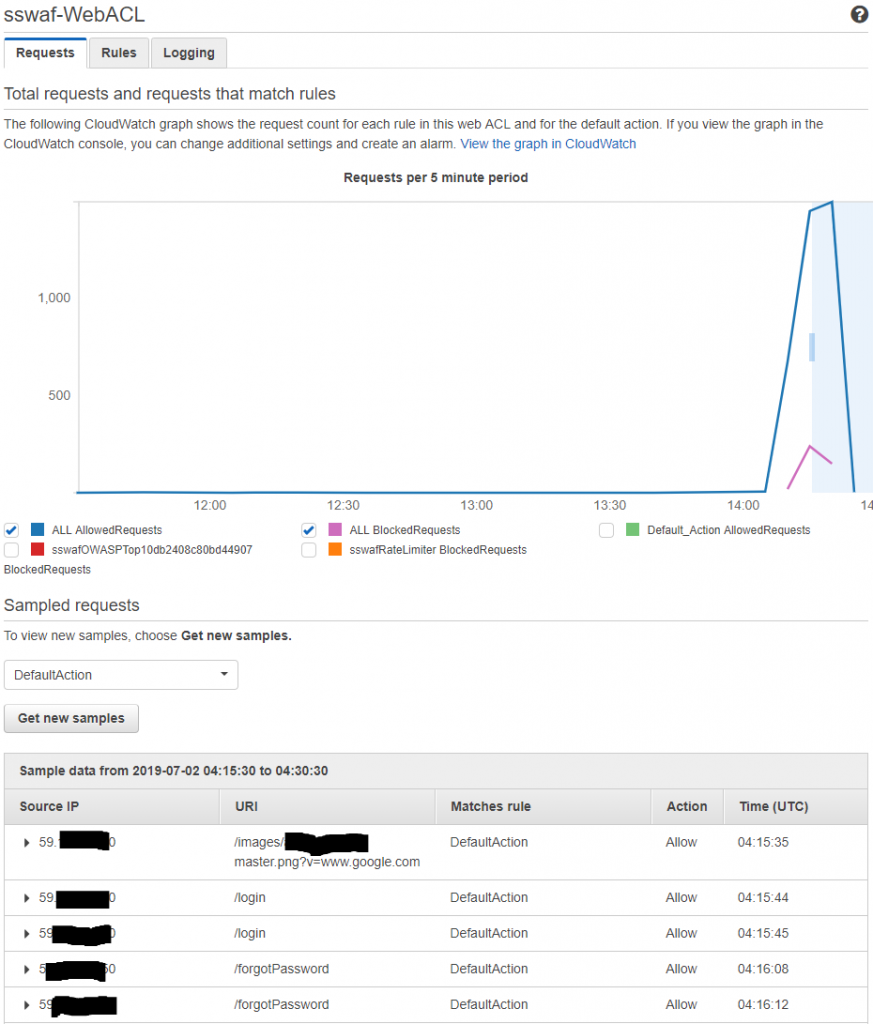
All looks good for the rate limiting based blocking, though it appears that blocking does not occur are exactly 2000 requests in the 5 minute period. It also appears that there is a significant (5-10min) delay on metrics coming through to the WAF stats in the AWS console.
AWS console about 10 mins after running the HTTP AB tool we can see blocks
After success on the rate limiting rule, the OWASP Top 10 mitigation rules need to be tested. I will use Owasp Zap to generate some malicious traffic and see when happen!
So it works – which is good, but I am not really confident about the effectiveness of the OWASP rules (as implemented on the AWS WAF). For now, they will do… but some tuning will probably be desirable as all of the requests OWASP ZAP made contained (clearly) malicious content but only 7% (53 / 755) of the requests were blocked by the WAF service. It will be interesting to see if there are false positives (valid requests that are blocked) when I conduct step 4, performance testing.
Step 4 – Conduct performance test using AWS WAF service, and
Conducting a load test with https://app.loadimpact.com demonstrated that the AWS WAF service is highly unlikely to become a bottleneck (though this may differ for other applications and implementations).
Step 5 – Migrate PROD to the AWS WAF service.
Our environment is fully ‘terraformed’, implementing the AWS WAF service as part of our terraform code was working within an hour or so (which is good time for me!).