Categories
ITOps

AWS RDS (Oracle 12c) Offsite Backups

A lot of people need to do offsite backups for AWS RDS – which can be done trivially within AWS. If you need offsite backups to protect you against things like AWS account breach or AWS specific issues – offsite backups must include diversification of suppliers.

I am going to use Amazon’s Data Migration service to replicate AWS RDS data to a VM running in Azure and set up snapshots/backups of the Azure hosts.

The new (2018) AWS Data Migration Service solve offisite RDS backup problems

The steps I used to do this are:

  1. Set up an Azure Windows 2016 VM
  2. Create an IPSec tunnel between the Azure Windows 2016 VM and my AWS Native VPN
  3. Install matching version of Oracle on the Windows 2016 VM
  4. Configure Data Migration service
  5. Create a data migration and continuous replication task
  6. Snapshots/Backups and Monitoring
  7. Debug and Gotchyas

1,2 – Set up Azure Windows 2016 VM and IPSec tunnel

Create Network on Azure and place a VM in the network with 2 interfaces. One interface must have an public IP, call this one ‘external’ and the other inteface will be called ‘internal’ – Once you have the public IP address of your Windows 2016 VM, create a ‘Customer Gateway’ in your AWS VPC pointing to that IP. You will also need a ‘Virual Private Gateway’ configured for that VPC. Then create a ‘Site-to-Site VPN connection’ in your VPC (it won’t connect for now but create it anyway). Configure your Azure Win 2016 VM to make an IPSec tunnel by following these instructions (The instructions are for 2012 R2 but the only tiny difference is some menu items):
https://docs.aws.amazon.com/vpc/latest/adminguide/customer-gateway-windows-2012.html#cgw-win2012-download-config. Once this is completed both your AWS site-to-site connection and your Azure VM are trying to connect to each other. Ensure that the Azure VM has its security groups configured to allow your AWS site-to-site vpn to get to the Azure VM (I am not sure which ports and protocols specifically, I just white-listed all traffic from the two AWS tunnel end points. Once this is done it took around 5 mins for the tunnel to come up (I was checking the status via the AWS Console), I also found that it requires traffic to be flowing over the link, so I was running a ping -t <aws_internal_ip> from my Azure VM. Also note that you will need to add routes to your applicable AWS route tables and update AWS security groups for the Azure subnet as required.

3 – Install matching version of Oracle on the Windows 2016 VM

4,5 – Configure Data Migration service and migration/replication

Log into your AWS console and go to ‘Data Migration Service’ / ‘DMS’ and hit get started. You will need to set up a replication VM (well atleast pick a size, security group, type etc). Note that the security group that you add the replication host to must have access to both your RDS and your Azure DBs – I could not pick which subnet the host went into so I had to add routes for a couple more subnets that expected. Next you will need to add your source and target databases. When you add in the details and hit test the wizard will confirm connectivity to both databases. I ran into issue on both of these points because of not adding the correct security groups, the windows firewall on the Azure VM and my VPN link dropping due to no traffic (I am still investigating a fix better than ping -t for this). Next you will be creating a migration/replication task, if you are going to be doing ongoing replication you need to run the following on your Oracle RDS db:

  • exec rdsadmin.rdsadmin_util.set_configuration(‘archivelog retention hours’, 24);
  • exec rdsadmin.rdsadmin_util.alter_supplemental_logging(‘ADD’,’ALL’);
  • exec rdsadmin.rdsadmin_util.alter_supplemental_logging(‘DROP’,’PRIMARY KEY’);

You can filter by schema, which should provide you with a drop down box to select which schema/s. Ensure that you enable logging on the migration/replication task (if you get errors, which I did the first couple of attempts, you won’t be fixing anything without the logs.

6 – Snapshots and Monitoring

For my requirements, daily snapshots/backups of the Azure VM will provide sufficient coverage. The Backup vault must be upgraded to v2 if you are using a Standrd SSD disk on the Azure VM, see:
https://docs.microsoft.com/en-us/azure/backup/backup-upgrade-to-vm-backup-stack-v2#upgrade . To enable email notifications for Azure backups, go to the azure portal, select the applicable vault, click on ‘view alerts’ -> ‘Configure notifications’ -> enter an email address and check ‘critical’ (or what type of email notifications you want. Other recommended monitoring checks include: ping for VPN connectivity, status check of DMS task (using aws cli), SQL query on destination database confirming latest timestamp of a table that should have regular updates.

7 – Debug and Gotchyas

  • Azure security group allowing AWS vpn tunnel endpoint to Azure VM
  • Windows firewall rule on VM allowing Oracle traffic (default port 1521) from AWS RDS private subnet
  • Route tables on AWS subnets to route traffic to your Azure subnet via the Virtual Private Network
  • Security groups on AWS to allow traffic from Azure subnet
  • Stability of the AWS <–> Azure VM site-to-site tunnel requires constant traffic
  • The DMS replication host seems to go into an arbitrary subnet of your VPC (there probably some default setting I didn’t see) but check this and ensure it has routes for the Azure site-to-site
  • Ensure the RDS Oracle database has the archive log retention and supplemental logs settings as per steps 4,5.
  • Azure backup job fails with ‘Currently Azure Backup does not support Standard SSD disks’. – upgrade backup vault: https://docs.microsoft.com/en-us/azure/backup/backup-upgrade-to-vm-backup-stack-v2#upgrade
Categories
GoLang Web Application

Getting started with a Golang web application

Started looking at Golang about a year ago, reading through a few tutorials and writing some script sized programs. At the time I thought I would use Golang for specific sysadmin type tasks. It didn’t really pan out as the time to completion vs bash or python is almost always much lower. Scripting in bash and pythons means you can always fix bugs with just a text editor with no compiling – dependency management is pretty simple, on all linux distros. So I didn’t write anything in Golang for almost a year and forgot most of it! I have an idea for a business tool enabling mapping and execution of organisational objectives, strategy and operations.

Learning with a Project

The only way to learn a programming language is to use it on a project (or many). So I am building a web application that requires:

  • Authentication/Identification/Roles
  • Forms for input
  • Navigation/Searching/SIngle page
  • Charting/Models
  • Persistent data
  • Security controls such as csrf tokens

IDE

Previously I added a bunch of plugins to vim and managed a custom and complex vimrc file. I found that having to manage all of that on numerous workstations was too time expensive. So – in an effort for workstation portability and ease of management, I am trying the GoLand ide by JetBrains. I will decide after my 30 day trial whether or not to pay the 200 usd per year price tag. If it means I write code more often (not avoiding the environment setup, maintenance and portability issues) it may well be worth it. Ended up going with Microsoft Visual Code which is on linux, macos and windows, is opensource, free and quick and easy to set up.

After thinking about what I just wrote above – it is nonsense. I should just take 30 minutes to write down how to set up a decent Golang environment. Started but abandoned: https://mwclearning.com/?p=1858

Tutorial

https://golang.org/doc/articles/wiki/ is a nice short tutorial from the makers or Golang that introduces the basic concepts. That along with A tour of Go are enough to get started.

TechStack

Starting with:

  • Relational database backend (postgres)
  • Javascript frontend (vuejs)
  • Application code (Golang)
  • Framework (gin / echo)
  • Requirement tracking / Agile board (taskworld)
  • Source code management (gitlab.com – free private repos)
  • Integrate Development Environment (Microsoft Visual Code)

Getting started

Tutorials based on what I features are needed to meet requirements.

Categories
GoLang Web Application Random

Free Golang IDE (s) on macos (Visual Studio Code / vim)

Visual Studio Code

Visual Studio Code is a now is Microsoft’s now OpenSource IDE that runs on windows, macos and linux!

Simple set up guide here: https://rominirani.com/setup-go-development-environment-with-visual-studio-code-7ea5d643a51a. Assuming go is installed and ready to do – the download, install and setup took about 5 minutes. Everything just works out of the box and its much less dependency on complex config files and plugins (vs vim).


Vim (abandoned this for Microsoft Visual Code)

Install these if they are not already:

brew install vim
# Note that is is executing arbitrary code from an the vim-go repo 
curl -fLo ~/.vim/autoload/plug.vim --create-dirs https://raw.githubusercontent.com/junegunn/vim-plug/master/plug.vim 
git clone https://github.com/fatih/vim-go.git ~/.vim/plugged/vim-go
  • Customise ~/.vimrc to enable and configure your plugins and shortcut keys
  • Once th ~/.vimrc is added run :GoInstallBinaries to get vim-go’s dependencies

Shortcut keys in this vimrc:

  • \ + b -> build
    • if errors occur toggle forward and back through them with ctrl + n and ctrl + m
    • close quick fix dialogue boxes with \ + a
  • \ + i -> install
  • dif (whilst on func def, delete all contents for func)

Autocompletion sucks though 🙁 so adding neocomplete is a must).

With existing versions of brew installed vim and the introduced dependency of xcode makes the setup time high. I went through this in the past and after a fairly long hiatus from writing code if find nothing is working quite right.


Categories
ITOps

Windows Remote Desktop Services 2016 Review

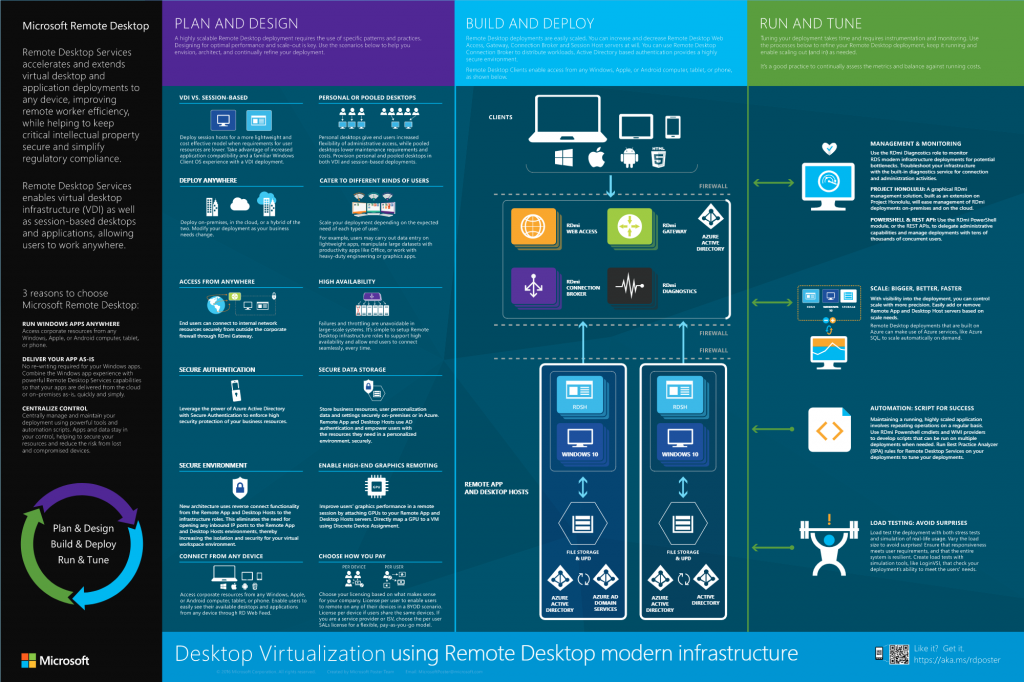
It has been a long while since I looked at RDS – with Azure, Office 365 and Server 2016 there seems to be a lot of new (or better) options. To get across some of the options I have decided to do a review of Microsoft’s documentation with the aim of deciding on a solution for a client. The specific scenario I am looking at is a client with low spec workstations, using Office 365 Business Premium (including OneDrive), Windows 10 and have a single Windows 2016 Virtual Private Server.

Some desired features:

  • Users should be able to use their workstations or the remote desktop server interchangeably
  • Everything done on workstations should be replicated to the RDS server and visa-versa
  • Contention on editing documents should be dealt with reasonably
  • The credential for signing into workstations, email and remote services should be the same (ideally with a 2FA option for RDS)

Issues faced:

  • The Office 365 users were created several months before the RDS server was deployed
    • The Azure AD connect service which synchronizes users in an Active Directory deployment with Office 365 user (Azure AD) is a one way street, assuming the ‘on-prem’ active directory object exist already and only need to be create in Azure AD (Office 365) – see the work around for this here
  • Office 365 licensing for ‘shared’ computers means that Office 365 Business Premium users can’t use a VPS – so entrerprise plans of business plus must be used.

How to configure Remote Desktop Services? After getting Active Directory installed and configure to sync with Azure AD I now need choose and implement the RDS configuration.

Starting with the Microsoft Doc we have the following options:

  • Session-based virtualization – Many users per host
  • VDI – Virtual machine for each user — note that if your server is already a VM this isnt really an option (nested VMs are not ideal)

Based on our clients situation – session-based make much more sense for now. Next up – what are we going to publish to the users logging into remote desktop service?

  • Desktops – Providing users with the full desktop experience
  • RemoteApps – Users run apps that seem to be running locally but are in fact being served via RDS

Desktops makes sense for now. So – how do we set up a Session-based desktop for remote access by multiple users?

  1. Add the required roles to the RDS servers (see: https://docs.microsoft.com/en-us/windows-server/remote/remote-desktop-services/rds-deploy-infrastructure)
  2. Create an AD service and link it to office 365 with Azure AD Connect

As Microsoft says:

  • You still must have an internet-facing server to utilize RD Web Access and RD Gateway for external users
  • You still must have an Active Directory and–for highly available environments–a SQL database to house user and Remote Desktop properties
  • You still must have communication access between the RD infrastructure roles (RD Connection Broker, RD Gateway, RD Licensing, and RD Web Access) and the end RDSH or RDVH hosts to be able to connect end-users to their desktops or applications.

After setting all of this up I am very happy with the results. The single source of truth for user must be the ‘on-prem’ AD. Syncing an on-prem AD service to Office 365 is almost seemless with some miner tweak required that are fairly easy to find with some googling.

Categories
ITOps

Sync users from Office 365 for a new Active Directory Install

Importing users from Office 365 to an on Prem-AD can be required in cases where an organisation who has been using Office 365 wants to start using a Remote Desktop Service or alike. To reduce the number of passwords and provide single sign on (or at least same sign on) the Windows Server my have Azure AD connect installed and be syncing with the businesses Office 365 account. The problem is that out of the box Azure AD connect is a one way street. It only creates object on the Azure side – it does not import Office 365 users into the server’s Active Directory.

To get users from Office 365 created in a new Windows Active Directory Service:

## Connect to Office 365 with PowerShell
Set-ExecutionPolicy Unrestricted -Force # can be reverted at the end
$O365CREDS = Get-Credential
$SESSION = New-PSSession -ConfigurationName Microsoft.Exchange -ConnectionUri https://ps.outlook.com/powershell -Credential $O365CREDS -Authentication Basic -AllowRedirection
Import-PSSession $SESSION
Connect-MsolService -Credential $O365CREDS 
# For more details see: https://oddytee.wordpress.com/2013/03/21/connect-to-office-365-with-powershell/

## Get a list of Office 365 User Objects 
Get-User | Export-Csv "C:\O365Export.csv" -NoTypeInformation 

## Use that list to create new AD users - slightly modified from source material
import-csv C:\O365Export.csv -Encoding UTF8 | foreach-object {New-ADUser -Name ($_.Firstname + "." + $_.Lastname) -SamAccountName ($_.Firstname + "." + $_.Lastname) -GivenName $_.FirstName -Surname $_.LastName -City $_.City -Department $_.Department -DisplayName $_.DisplayName -Fax $_.Fax -MobilePhone $_.MobilePhone -Office $_.Office -PasswordNeverExpires ($_.PasswordNeverExpires -eq "True") -OfficePhone $_.PhoneNumber -PostalCode $_.PostalCode -EmailAddress $_.SignInName -State $_.State -StreetAddress $_.StreetAddress -Title $_.Title -UserPrincipalName $_.UserPrincipalName -Enabled $True -AccountPassword (ConvertTo-SecureString -string "Password" -AsPlainText -force) }

Sources:

Categories
Introduction to OpenStack ITOps

Changing OpenStack endpoints from HTTP to HTTPS

After deploying OpenStack Keystone, Swift and Horizon I have a need to change the public endpoints for these services from HTTP to HTTPS.

Horizon endpoint

This deployment is a single server for Horizon. The TLS/SSL termination point is on the server (no loadbalancers or such).

To get Horizon using TLS/SSL all that needs to be done is adding the keys, cert, ca and updating the vhost. My vhost not looks like this:

WSGISocketPrefix run/wsgi
<VirtualHost *:80>
	ServerAdmin sys@test.mwclearning.com
	ServerName horizon-os.mwclearning.com.au
	ServerAlias api-cbr1-os.mwclearning.com.au
	ServerAlias api.cbr1.os.mwclearning.com.au
	ServerName portscan.assetowl.ninja
	Redirect permanent / https://horizon-os.mwclearning.com.au/dashboard
</VirtualHost>

<VirtualHost *:443>
	ServerAdmin sys@test.mwclearning.com
	ServerName horizon-os.mwclearning.com.au
	ServerAlias api-cbr1-os.mwclearning.com.au
	ServerAlias api.cbr1.os.mwclearning.com.au

	WSGIDaemonProcess dashboard
	WSGIProcessGroup dashboard
	WSGIScriptAlias /dashboard /usr/share/openstack-dashboard/openstack_dashboard/wsgi/django.wsgi
	Alias /dashboard/static /usr/share/openstack-dashboard/static

	<Directory /usr/share/openstack-dashboard/openstack_dashboard/wsgi>
		Options All
		AllowOverride All
		Require all granted
	</Directory>

	<Directory /usr/share/openstack-dashboard/static>
		Options All
		AllowOverride All
		Require all granted
	</Directory>
	SSLEngine on
	SSLCipherSuite ECDH+AESGCM:DH+AESGCM:ECDH+AES256:DH+AES256:ECDH+AES128:DH+AES:ECDH+3DES:DH+3DES:RSA+AESGCM:RSA+AES:RSA+3DES:!aNULL:!MD5:!DSS:!RC4
	SSLCertificateKeyFile /etc/pki/apache/wildcard.mwclearning.com.au-201710.key.pem
	SSLCertificateFile /etc/pki/apache/wildcard.mwclearning.com.au-201710.cert.pem
	SSLCACertificateFile /etc/pki/apache/wildcard.mwclearning.com.au-201710.ca.pem
</VirtualHost>

With a systemctl restart httpd this was working….

Logging into Horizon and checking the endpoints under Project -> Compute -> API Access I can see some more public HTTP endpoints:

Identity	http://api.cbr1.os.mwclearning.com:5000/v3/
Object Store	http://swift.cbr1.os.mwclearning.com:8080/v1/AUTH_---

These endpoints are defined in Keystone, to see them and edit them there I can ssh to the keystone server and run some mysql queries. Before I do this I need to make sure that the swift and keystone endpoints are configure to use TLS/SSL.

Keystone endpoint

Again the TLS/SSL termination point is apache… so some modification to /etc/httpd/conf.d/wsgi-keystone.conf is all that is required:

Listen 5000
Listen 35357

<VirtualHost *:5000>
    WSGIDaemonProcess keystone-public processes=5 threads=1 user=keystone group=keystone display-name=%{GROUP}
    WSGIProcessGroup keystone-public
    WSGIScriptAlias / /usr/bin/keystone-wsgi-public
    WSGIApplicationGroup %{GLOBAL}
    WSGIPassAuthorization On
    LimitRequestBody 114688
    <IfVersion >= 2.4>
      ErrorLogFormat "%{cu}t %M"
    </IfVersion>
    ErrorLog /var/log/httpd/keystone.log
    CustomLog /var/log/httpd/keystone_access.log combined

    <Directory /usr/bin>
        <IfVersion >= 2.4>
            Require all granted
        </IfVersion>
        <IfVersion < 2.4>
            Order allow,deny
            Allow from all
        </IfVersion>
    </Directory>
Alias /identity /usr/bin/keystone-wsgi-public
<Location /identity>
    SetHandler wsgi-script
    Options +ExecCGI

    WSGIProcessGroup keystone-public
    WSGIApplicationGroup %{GLOBAL}
    WSGIPassAuthorization On
</Location>
	SSLEngine on
	SSLCipherSuite ECDH+AESGCM:DH+AESGCM:ECDH+AES256:DH+AES256:ECDH+AES128:DH+AES:ECDH+3DES:DH+3DES:RSA+AESGCM:RSA+AES:RSA+3DES:!aNULL:!MD5:!DSS:!RC4
	SSLCertificateKeyFile /etc/pki/apache/wildcard.mwclearning.com.au-201710.key.pem
	SSLCertificateFile /etc/pki/apache/wildcard.mwclearning.com.au-201710.cert.pem
	SSLCACertificateFile /etc/pki/apache/wildcard.mwclearning.com.au-201710.ca.pem
</VirtualHost>

<VirtualHost *:35357>
    WSGIDaemonProcess keystone-admin processes=5 threads=1 user=keystone group=keystone display-name=%{GROUP}
    WSGIProcessGroup keystone-admin
    WSGIScriptAlias / /usr/bin/keystone-wsgi-admin
    WSGIApplicationGroup %{GLOBAL}
    WSGIPassAuthorization On
    LimitRequestBody 114688
    <IfVersion >= 2.4>
      ErrorLogFormat "%{cu}t %M"
    </IfVersion>
    ErrorLog /var/log/httpd/keystone.log
    CustomLog /var/log/httpd/keystone_access.log combined

    <Directory /usr/bin>
        <IfVersion >= 2.4>
            Require all granted
        </IfVersion>
        <IfVersion < 2.4>
            Order allow,deny
            Allow from all
        </IfVersion>
    </Directory>
Alias /identity_admin /usr/bin/keystone-wsgi-admin
<Location /identity_admin>
    SetHandler wsgi-script
    Options +ExecCGI

    WSGIProcessGroup keystone-admin
    WSGIApplicationGroup %{GLOBAL}
    WSGIPassAuthorization On
</Location>
</VirtualHost>

I left the internal interface as HTTP for now…

Swift endpoint

OK so swift one is a bit different… its actually recommended to have an SSL termination service in front of the swift proxy see: https://docs.openstack.org/security-guide/secure-communication/tls-proxies-and-http-services.html

With that recommendation from OpenStack and ease of creating an apache reverse proxy – I will do that.

# install packages
sudo yum install httpd mod_ssl

After install create a vhost  /etc/httpd/conf.d/swift-endpoint.conf contents:

<VirtualHost *:443>
  ProxyPreserveHost On
  ProxyPass / http://127.0.0.1:8080/
  ProxyPassReverse / http://127.0.0.1:8080/

  ErrorLog /var/log/httpd/swift-endpoint_ssl_error.log
  LogLevel warn
  CustomLog /var/log/httpd/swift-endpoint_ssl_access.log combined

  SSLEngine on
  SSLCipherSuite ECDH+AESGCM:DH+AESGCM:ECDH+AES256:DH+AES256:ECDH+AES128:DH+AES:ECDH+3DES:DH+3DES:RSA+AESGCM:RSA+AES:RSA+3DES:!aNULL:!MD5:!DSS:!RC4
  SSLCertificateKeyFile /etc/httpd/tls/wildcard.mwclearning.com.201709.key.pem
  SSLCertificateFile /etc/httpd/tls/wildcard.mwclearning.com.201709.cert.pem
  SSLCertificateChainFile /etc/httpd/tls/wildcard.mwclearning.com.201709.ca.pem
</VirtualHost>
#resart apache
systemctl restart httpd

So now we should have an endpoint that will decrypt and forward https request from port 443 to the swift listener on port 8080.

Updating internal auth

As keystones auth listener is the same for internal and external (vhost) I also updated the internal address to match the FQDN allowing for valid TLS.

Keystone service definitions

mysql -u keystone -h services01 -p
use keystone;
select * from endpoint;
# Updating these endpoints with 
update endpoint set url='https://swift-os.mwclearning.com:8080/v1/AUTH_%(tenant_id)s' where id='579569...';
update endpoint set url='https://api-cbr1-os.mwclearning,com:5000/v3/' where id='637e843b...';
update endpoint set url='http://controller01-int.mwclearning.com:5000/v3/' where id='ec1ad2e...';

Now after restarting the services all is well with TLS!
Categories
Introduction to OpenStack Online Courses

Session 4: Deploying a Virtual Machine from Horizon

After session 3 we have a running OpenStack deployment. Now to deploy a VM.

First off – after starting the OpenStack node I am getting connection refused when trying to connect to Horizon. To check OpenStack services I will follow: https://docs.openstack.org/fuel-docs/latest/userdocs/fuel-user-guide/troubleshooting/service-status.html. These instructions don’t really work for devstack on CentOS but they are a good starting point.

Horizon is dependent on apache so systemctl status httpd revealing apache not running was the first issue. After starting apache I receive an error “cannot import name cinder” when trying to load http://devstack/dashboard. So I need to check the status of the other OpenStack services. As this is a DevStack deployed OpenStack, the service names are not the same as the doc suggests:

[root@devstack ~]# systemctl list-units | grep stack
 devstack@c-api.service    loaded active running
 devstack@c-sch.service    loaded active running
 devstack@c-vol.service    loaded active running
 devstack@dstat.service    loaded active running
 devstack@etcd.service     loaded active running
 devstack@g-api.service    loaded active running
 devstack@g-reg.service    loaded active running
 devstack@keystone.service loaded active running
 devstack@n-api-meta.service loaded active running
 devstack@n-api.service    loaded active running
 devstack@n-cauth.service  loaded active running
 devstack@n-cond-cell1.service loaded active running
 devstack@n-novnc.service  loaded active running
 devstack@n-sch.service    loaded active running
 devstack@n-super-cond.service loaded active running
 devstack@placement-api.service loaded active running
● devstack@q-agt.service   loaded failed failed 
 devstack@q-dhcp.service loaded active running
 devstack@q-l3.service   loaded active running
 devstack@q-meta.service loaded active running
 devstack@q-svc.service  loaded active running
 system-devstack.slice  loaded active active

So I can see that q-agt.service is not running. This is a critical component of Neutron so lets continue troubleshooting by trying to start that service. The service started after running systemctl start devstack@q-agt.service but failed again within a minute or so.

journalctl -u devstack@q-agt.service revealed:

CRITICAL neutron [-] Unhandled error: Exception: Could not retrieve schema from tcp:127.0.0.1:6640: Connection refused
...
ovs|00002|db_ctl_base|ERR|transaction error: {"details":"Transaction causes multiple rows in \"Manager\" table to have identical values (\"ptcp:6640:127.0.0.1\") for index on column \"target\". First ro

A quick google search lead me to: https://ask.openstack.org/en/question/109750/systemd1-devstackq-agtservice-failed/

SELinux… just to confirm I ran a setenforce 0 and start the service again – all is fine. In a proper environment I would not be satisfied with just leaving SELinux disabled… but for the lab I will move on with it disabled. With devstack@q-agt.service running now – Horizon is loading as expected.

So back to the coursework, the objectics of session 4:

  • Describe the purpose and use of tenants, users, and roles.
  • Differentiate between administrative scopes in Horizon.
  • Discuss the different components that are required for deploying instances from Horizon.
  • Deploy an instance from Horizon.

Logging in as as admin we look at the admin interface in Horizon and discuss the separation of tenants via projects, the view of infrastructure and instances. Creating a tenant (project) and a user is then completed… pretty straight forward. Interesting note is that under projects/tenants a ‘service’ project is created by default for the OpenStack services. I can see that cinder, placement, glance, nova and neutron users have been created and added to the service project.

Project Quotas are discussed as a method for limiting the amount of resources a tenant can consume. Creating a user to add to the project is then conducts – providing them with a role, ‘User’ enables them to create VMs networks etc.

What is need to deploy an instance in an OpenStack environment:

  • Compute node (nova)
  • Networking – at least private network (neutron)
  • VM Image (glance)
  • Security – Security Groups (nova)
  • Storage – Cinder

Creating an Instance via Horizon:

  • Configure networking (create a SDN, private + generally attaching floating IPs)
  • Assign floating IP addresses
  • Define a security group in the cloud
  • Create an SSH key pair
  • Create a Glance image
  • Choose a flavor
  • The instance can be booted.

The session runs through these steps in more details. Anyone who has used AWS will be familiar with each step. The only one that  really takes some consideration with this lab environment is the software defined networks. This issue then spilled into my nova service being in accessible thus preventing VMs from being launched. Suffice to say at this point, altering the physical network underlying the whole stack is likely to end badly! I need to get a fuller understanding of how Neutron works with underlying hardware devices and how to reconfigure nova without redeploying the whole devstack.

Categories
Introduction to OpenStack Online Courses

Session 3: Deploying OpenStack (PackStack and DevStack)

Session 3 looks at deploying OpenStack via manual, scripted and large scale methods.

  • Manual component deployments – see https://docs.openstack.org
  • Scripted – PackStack and DevStack are the primary options for scripted deployments of OpenStack
  • Large scale deployment – can be achieved with more advanced solutions such as TripleO, Director and others

In a typical OpenStack deployment there will be a number of node roles. For example:

  • Controller node – Typically the node controlling services (Keystone, Message queue, MariaDB, time servers etc)
  • Network controller node – Providing network services (routing -internal and external, software defined networking)
  • Compute nodes – Hypervisors with Nova agents
  • Storage nodes – Swift / Ceph etc

Of course for demo environment all of these roles may be fulfilled by 1 server.

DevStack is a scripted deployment tool that is ideal for testing and local machine lab environments. The course material is in reference to the Mitaka release of OpenStack which has already been EOLed and is for Ubuntu based servers which will provide less relevance for my CentOS/RHEL work environment. So, I will deviate from the course slightly by using CentOS 7 and the Pike release of OpenStack.

There are some Docker images of DevStack which were tempting but for the purposes of learning decided to stick with a VM. To install DevStack on CentOS 7 i completed the following:

  1. Create a VM on Hyper-V (or whatever) with CentOS 7 minimal (I choose to provide 6GB RAM (4GB aluminum), 2 vCPU, 60GB storage
    1. I also created a Hyper V virtual internal network which enabled static internal IP addresses and an external Hyper V network for internet connectivity
  2. ssh to the VM and download devstack and install via (depending on your internet connection this can take more than 1 hour):

    git clone https://git.openstack.org/openstack-dev/devstack
    cd devstack
    # create local.conf with the following contents:
    #	[[local|localrc]]
    #	ADMIN_PASSWORD=secret
    #	DATABASE_PASSWORD=$ADMIN_PASSWORD
    #	RABBIT_PASSWORD=$ADMIN_PASSWORD
    #	SERVICE_PASSWORD=$ADMIN_PASSWORD
    ./stash.sh
  3. The Horizon interface should now be waiting for you when hitting the VMs IP / Hostname via a browser

Installing an all-on-one VM deployment of OpenStack on CentOS 7 using DevStack took all of about 30 minutes. This was pretty simple and seamless. Later I will need to try installing RDO via the scripted method – PackStack.

Back the course material we take a look at the node roles:

  • Controller node – Keystone, message queue, MariaDB and other critical services. May be 1, 1+n redundancy, n+n were high load is expected.
  • Network node – Providing the software defined networking (Neutron)
  • Compute node – Run the instances (Nova agent + Hypervisor)
  • Storage node – Swift/Ceph

There is a couple of slides now talking specifically about RedHat and CentOS. RDO is the OpenSource version of RedHats OpenStack platform and then a was through of deploying OpenStack on CentOS 7 with PackStack

Categories
Introduction to OpenStack Online Courses

Session 2: Understanding OpenStack

After a pretty basic Session 1, looking forward to focusing in more on OpenStack. We start off with some history and a look at the OpenStack Foundation.

OpenStack started in 2010 as a joint project between RackSpace (providing Swift) and NASA (providing Nova). The role of the OpenStack Foundation is described as:

to promote the global development, distribution, and adoption of the cloud operating system. It provides shared resources to grow the OpenStack cloud. It also enables technology vendors and developers to assist in the production of cloud software.

That’s a bit to abstract for me to understand… but anyway.. also mentioned is information on how to contribute and get help with OpenStack. I think https://ask.openstack.org/en/questions/ will come in very handy. As OpenStack is a community project hopefully I can find something to contribute here – https://wiki.openstack.org/wiki/How_To_Contribute.

We know start looking at the OpenStack Projects. Being aware of these projects and their maturity status is critical for operating an OpenStack deployment effectively.

Core OpenStack Projects

There are some other project that have high adoptions rates (>50% of OpenStack deployments):

  • Heat – Orchestration of Cloud Services via code (text definitions) and also provides auto-scaling ala AWS CloudFormation
  • Horizon – OpenStack’s dashboard with web interface
  • Ceilometer – Metering and data collection service enabling metering, billing, monitoring and data driven operations

Other projects introduced in this session:

  • Trove – Database as a Service (ie: AWS RDS)
  • Sahara – Hadoop as a Service
  • Ironic – Bare metal provisioning (very good name!)
  • Zaqar – Messaging service with multi tenant queues, high availability, scalability, REST API and web-socket API
  • Manila – Shared File System service – Like running samba in the cloud
  • Designate – DNS as a Service (backed by either Bind or PowerDNS) – also integrates with Nova and Neutron for auto-generation of DNS record
  • Barbican – Secret and Key management
  • Magnum – Aims to enable the usage of Swarm, Kubernetes more seamlessly in OpenStack
  • Murano – Application catalogue
  • Congress – Policy as a Service

After introducing these core services the session delves into a little more detail on the key.

Nove Compute is arguably the most important components. It manages the lifecycle (spawning, scheduling and decommissioning) of all VMs on the platform. Nova is not the hypervisor, it interfaces to the hypervisor you are  using (Xen, KVM, VMware, vSphere) via an agent that is installed on the hypervisor. Nova should be deployed in a distributed fashion where some agents run at local work points and some server processes run on the management servers.

Neutron Networking allows users to define their own networking between VMs they have deployed. Two instances may be deployed on 2 separate physical clusters but the user wants the on the same subnet and broadcast network. Though this can’t be done at the physical level, Neutron’s software defined network enable a logical network to be define which transparently configures the underlying network infrastructure to provide that experience to the user. Neutron uses a pluggable architecture meaning most vendors will enable Neutrons SDNs. Neutron has an API that allows networks to be defined and configured.

Swift Object Storage provides highly scalable storage. It is analgous to AWS’s S3 service. Applications running on OpenStack can talk to a swift proxy which stores the data provided to them on multiple storage nodes. This makes it very fault tolerant. The swift proxy is able to make many parallel requests to storage nodes making scalability quite easy. The swift services can be interfaced with via a RESTful api.

Glance Image provides the ability to store virtual disk images. Glance should use Swift/Ceph as a scalable backend for storing the images. A list of ready to download images can be found here: https://docs.openstack.org/image-guide/obtain-images.html – Windows images are available (supported with Hyper-V and KVM hypervisors). An example of deploying an image to Glance (when using KVM):

gunzip -cd windows_server_2012_r2_standard_eval_kvm_20170321.qcow2.gz | 
glance image-create --property hypervisor_type=QEMU --name "Windows Server 2012 R2 Std Eval" 
--container-format bare --disk-format qcow2 --property os_type=windows

Cinder Block Storage is, in essence, the same as AWS Elastic Block Storage [EBS] whereby persistent volumes can be attached to VMs. Cinder can use Swift/Ceph (or linux LVM) as a backend for storage. Instance storage, without Cinder Block Storage is ephemeral.

Keystone Identity provides authentic and authorization services for OpenStack services. Keystone also provides the central repository for available services and their end points. Keystone also enables definition of Users, Roles that can be assigned to Projects (Tenants). Keystone uses MariaDB by default but can use LDAP (not sure if a DB backend is still required in that case).

Behind the core OpenStack services above – there are some other critical services (dependencies):

  • Time synchronization – OpenStack services depend on this for communication, in particular Keystone issues access tickets that are tied to timestamps
  • Database – MariaDB (by default) for Keystone is a critical services
  • Message Queue – Enable message passing between services – which given the RESTful communications is again critical

Following on from the brief overview of key components of OpenStack we look at the RESTful api – basically just stating that HTTP with JSON is prevalent. If one wanted to basically all OpenStack operations could be complete with cURL.

Horizon is the introduced as a web-based GUI alternative to using the RESTful APIs or the command line client. The command line client  can be configure to point to Keystone from which it will discover all the other available services (Nova, Neutron, Swift, Glance etc). The Horizon Dashboard distinguished between Administrators and Tenants but based on our initial testing.

That’s a wrap for, Session 3 we will start deploying OpenStack!

Categories
Introduction to OpenStack Online Courses

Session 1: From Virtualization to Cloud Computing

In looking for an online, at your own pace course for getting a foundation understanding of OpenStack I came across edx.org’s OpenStack course (LFS152x). The full syllabus can be downloaded here.

Out of this course I hope to get an understanding of:

  • The key components of OpenStack
  • Hands on experience via some practical work
  • A local lab environment for further learning
  • Some resources that I can go back to in the future (ie: best forums)
  • The history and future of OpenStack
  • The next steps for building expertise with OpenStack

The course kicks off in Session 1 with a bunch of introductory information (including a page or so on The Linux Foundation who run more project I use than I was aware).

After the introductory items we go over the evolution from physicals servers to virtualization to cloud and why each step has been take… which really boils down to efficiency and cost savings.

  • Physical servers suck because they take up space and power and are difficult to properly utilize (physical hosts alone generally operate at < 10% capacity)
  • Virtualization lacks self-service
  • Virtualization has limited scalability as it is manual
  • Virtualization is heavy -> every VM has its own kernel
  • Containers are better than VMs by visualizing the operating system (many OS to 1 kernel)
  • Containers are also good because they remove a number of challenges along the deployment/development pipeline

Interestingly this introductory seems to focus in on containerization, describing what container images as the Application, User Space dependencies and Libraries required to run. Every running container has 3 components:

  1. Namespaces (network, mounts, PIDs) – provide isolation for processes in the container
  2. CGroups – reserve and allocate resources to containers
  3. Union file system – merge different filesystems into one, virtual filesystem (ie: overlayfs)

Some pros and cons of containers are discussed –  I am not sure about the security pros – versus VMs but I think the value provided by containerization has been well established.

Next up is some discussion on Cloud Computing. Though a lot of this stuff is fairly basic, its nice to review every now and then. The definition provided for Cloud Computing:

Cloud computing is an Internet-based computing that provides shared processing resources and data to computers and other devices on demand. It enables on-demand access to a shared pool of computing resources, such as networks, servers, storage, applications and services, which typically are hosted in third-party data centers.

The differences between IaaS, PaaS and SaaS are covered, a decent diagram to spot the differences (with Application representing the Software as a Service category):

A great point mention is that “If you do not need scalability and self-service, you might be better off using virtualization.” – which in my experience is very true. For some clients the added complexity that comes with enabling self service and dynamic scalability are not used and the stability and relative simplicity of static virtual machines is a better solution.

We then run through an example of deploying a VM on AWS… with the conclusion that OpenStack is about the same and has a more developed API (not sure about that yet!).

Will move on to Session 2 and hopefully start digging into OpenStack more specifically!