Categories
3D CAD Fundamental Online Courses

3D CAD Fundamental – Week 5

Ok so back for week 5! Three more to go!

This week we are deforming objects to (create fancy of irregular objects). Starting with the ‘scale’ tool, we look at how to scale 3d objects, and how holding ‘shift’ ensures that objects are scaled with reference to the center point. If only one side is selected the center point is the center of the 2d side, but we can also triple client with the select tool to select the entire 3d object and scale with reference to the central point of the 3d shape by holding the ctrl key.

Duplication can be achieved with the move tool, ctrl + move, place the new copy where desired then type ‘5x’ for 5 copies. We make some curtains by stringing together curves, making a 2d shape then using the push/pull tool. Duplications, scales and mirrors using scale are all then needed for the curtains. Next we learn the the flip along is more useful than the scale tool for mirroring…

Internal copy arrays were covered next – enabling the duplication of an object to x distance away then using type /4, 3 new object are created at equal spacing between the original and the first copy.

Finally faces and planes were examined. Face have 2 sides, one light (front), one dark (back). Entity information indicates the colors of the front and back faces. Note that light reflection varies with the camera perspective. Change orientation of the plane enables reversing of the orientation of the faces (so that dark and bright effect is controllable). Using right click and ‘orient faces’ can force all faces of an object to be uniform.

The assignment this week was a re-creation of taipei 101.

Taipei 101 model
Categories
3D CAD Fundamental Online Courses

3D CAD Fundamental – Week 4

Unfortunately, as is common with these online course, I go distracted and was late on week 4. Luckily it was a pretty light week, working through:

  • Follow me tool
  • Rotation tool
  • Working with spheres

The assignment was creating a bike wheel with tread on the tyre. Getting the tread right was a bit finicky and since I created a circle with ‘too many sides’ rendering was very slow on my dell xps 15 9560.

Will work on getting back ahead of the schedule for week 5…

Categories
3D CAD Fundamental Online Courses

3D CAD Fundamental – Week 1 and 2

I want to make a model for a landscaping project in my garden. After testing a few different tools (sketchup, autocad, fusion 360 and LibreCAD) I realised that using these tools is not intuitive for me… So onto Corsera to do some learning!

My chosen initial course, 3D CAD Fundamental, is for complete novices to 3D modelling/Computer Aided Designed. There are follow up courses with some more extensive examples:

  1. 3D CAD fundamental
  2. 3D CAD Application
  3. BIM Fundamentals for Engineers
  4. BIM Application for Engineers

This, fundamental CAD course uses SketchUp Make 2017 as the CAD software. We are using ‘Construction Documentation – Meters’ template.

Week 1 is just set up of software and takes about 5 minutes.

Week 2 has a few worked through examples to get you using tools. I started this yesterday and it took my 30 minutes to draw a simple cube with some steps. The lesson introduced the following tools:

  • Line tool
  • Rectangle tool
  • Push/Pull tool
  • Tape measure tool + Guidlines

Also critical were some tidbits on what mouse icons mean, how to draw lines based on x,y,z axes (wow, axes is the plural of axis ?!), midpoints and typing numbers while drawing to be exact.

Magic Cube module, using line select line tool (click once, move to draw line, stick to axis to make it straight and type on the keypad the distance desired). Then using divide lines to build a stepped cube. Guidelines were also introduced along with the rectangle, pull and push tool.

From how difficult the Magic Cube module was, I saw the week 2 assignment and thought there was no way I could do it in less than 2 hours… but after failing for about 30 minutes, things become a lot easier. I guess getting used to perspective and managing the camera view helps a lot. Anyway I was very happy to complete my first 3D model!

week 2 desk

The ongoing pop quiz and extensive quiz/test at the end of each lesson seems to be a very effective method for holding attention and retaining more information from the lesson, surely more effective that a non-interactive lecture!

Categories
Introduction to OpenStack ITOps

Changing OpenStack endpoints from HTTP to HTTPS

After deploying OpenStack Keystone, Swift and Horizon I have a need to change the public endpoints for these services from HTTP to HTTPS.

Horizon endpoint

This deployment is a single server for Horizon. The TLS/SSL termination point is on the server (no loadbalancers or such).

To get Horizon using TLS/SSL all that needs to be done is adding the keys, cert, ca and updating the vhost. My vhost not looks like this:

WSGISocketPrefix run/wsgi
<VirtualHost *:80>
	ServerAdmin sys@test.mwclearning.com
	ServerName horizon-os.mwclearning.com.au
	ServerAlias api-cbr1-os.mwclearning.com.au
	ServerAlias api.cbr1.os.mwclearning.com.au
	ServerName portscan.assetowl.ninja
	Redirect permanent / https://horizon-os.mwclearning.com.au/dashboard
</VirtualHost>

<VirtualHost *:443>
	ServerAdmin sys@test.mwclearning.com
	ServerName horizon-os.mwclearning.com.au
	ServerAlias api-cbr1-os.mwclearning.com.au
	ServerAlias api.cbr1.os.mwclearning.com.au

	WSGIDaemonProcess dashboard
	WSGIProcessGroup dashboard
	WSGIScriptAlias /dashboard /usr/share/openstack-dashboard/openstack_dashboard/wsgi/django.wsgi
	Alias /dashboard/static /usr/share/openstack-dashboard/static

	<Directory /usr/share/openstack-dashboard/openstack_dashboard/wsgi>
		Options All
		AllowOverride All
		Require all granted
	</Directory>

	<Directory /usr/share/openstack-dashboard/static>
		Options All
		AllowOverride All
		Require all granted
	</Directory>
	SSLEngine on
	SSLCipherSuite ECDH+AESGCM:DH+AESGCM:ECDH+AES256:DH+AES256:ECDH+AES128:DH+AES:ECDH+3DES:DH+3DES:RSA+AESGCM:RSA+AES:RSA+3DES:!aNULL:!MD5:!DSS:!RC4
	SSLCertificateKeyFile /etc/pki/apache/wildcard.mwclearning.com.au-201710.key.pem
	SSLCertificateFile /etc/pki/apache/wildcard.mwclearning.com.au-201710.cert.pem
	SSLCACertificateFile /etc/pki/apache/wildcard.mwclearning.com.au-201710.ca.pem
</VirtualHost>

With a systemctl restart httpd this was working….

Logging into Horizon and checking the endpoints under Project -> Compute -> API Access I can see some more public HTTP endpoints:

Identity	http://api.cbr1.os.mwclearning.com:5000/v3/
Object Store	http://swift.cbr1.os.mwclearning.com:8080/v1/AUTH_---

These endpoints are defined in Keystone, to see them and edit them there I can ssh to the keystone server and run some mysql queries. Before I do this I need to make sure that the swift and keystone endpoints are configure to use TLS/SSL.

Keystone endpoint

Again the TLS/SSL termination point is apache… so some modification to /etc/httpd/conf.d/wsgi-keystone.conf is all that is required:

Listen 5000
Listen 35357

<VirtualHost *:5000>
    WSGIDaemonProcess keystone-public processes=5 threads=1 user=keystone group=keystone display-name=%{GROUP}
    WSGIProcessGroup keystone-public
    WSGIScriptAlias / /usr/bin/keystone-wsgi-public
    WSGIApplicationGroup %{GLOBAL}
    WSGIPassAuthorization On
    LimitRequestBody 114688
    <IfVersion >= 2.4>
      ErrorLogFormat "%{cu}t %M"
    </IfVersion>
    ErrorLog /var/log/httpd/keystone.log
    CustomLog /var/log/httpd/keystone_access.log combined

    <Directory /usr/bin>
        <IfVersion >= 2.4>
            Require all granted
        </IfVersion>
        <IfVersion < 2.4>
            Order allow,deny
            Allow from all
        </IfVersion>
    </Directory>
Alias /identity /usr/bin/keystone-wsgi-public
<Location /identity>
    SetHandler wsgi-script
    Options +ExecCGI

    WSGIProcessGroup keystone-public
    WSGIApplicationGroup %{GLOBAL}
    WSGIPassAuthorization On
</Location>
	SSLEngine on
	SSLCipherSuite ECDH+AESGCM:DH+AESGCM:ECDH+AES256:DH+AES256:ECDH+AES128:DH+AES:ECDH+3DES:DH+3DES:RSA+AESGCM:RSA+AES:RSA+3DES:!aNULL:!MD5:!DSS:!RC4
	SSLCertificateKeyFile /etc/pki/apache/wildcard.mwclearning.com.au-201710.key.pem
	SSLCertificateFile /etc/pki/apache/wildcard.mwclearning.com.au-201710.cert.pem
	SSLCACertificateFile /etc/pki/apache/wildcard.mwclearning.com.au-201710.ca.pem
</VirtualHost>

<VirtualHost *:35357>
    WSGIDaemonProcess keystone-admin processes=5 threads=1 user=keystone group=keystone display-name=%{GROUP}
    WSGIProcessGroup keystone-admin
    WSGIScriptAlias / /usr/bin/keystone-wsgi-admin
    WSGIApplicationGroup %{GLOBAL}
    WSGIPassAuthorization On
    LimitRequestBody 114688
    <IfVersion >= 2.4>
      ErrorLogFormat "%{cu}t %M"
    </IfVersion>
    ErrorLog /var/log/httpd/keystone.log
    CustomLog /var/log/httpd/keystone_access.log combined

    <Directory /usr/bin>
        <IfVersion >= 2.4>
            Require all granted
        </IfVersion>
        <IfVersion < 2.4>
            Order allow,deny
            Allow from all
        </IfVersion>
    </Directory>
Alias /identity_admin /usr/bin/keystone-wsgi-admin
<Location /identity_admin>
    SetHandler wsgi-script
    Options +ExecCGI

    WSGIProcessGroup keystone-admin
    WSGIApplicationGroup %{GLOBAL}
    WSGIPassAuthorization On
</Location>
</VirtualHost>

I left the internal interface as HTTP for now…

Swift endpoint

OK so swift one is a bit different… its actually recommended to have an SSL termination service in front of the swift proxy see: https://docs.openstack.org/security-guide/secure-communication/tls-proxies-and-http-services.html

With that recommendation from OpenStack and ease of creating an apache reverse proxy – I will do that.

# install packages
sudo yum install httpd mod_ssl

After install create a vhost  /etc/httpd/conf.d/swift-endpoint.conf contents:

<VirtualHost *:443>
  ProxyPreserveHost On
  ProxyPass / http://127.0.0.1:8080/
  ProxyPassReverse / http://127.0.0.1:8080/

  ErrorLog /var/log/httpd/swift-endpoint_ssl_error.log
  LogLevel warn
  CustomLog /var/log/httpd/swift-endpoint_ssl_access.log combined

  SSLEngine on
  SSLCipherSuite ECDH+AESGCM:DH+AESGCM:ECDH+AES256:DH+AES256:ECDH+AES128:DH+AES:ECDH+3DES:DH+3DES:RSA+AESGCM:RSA+AES:RSA+3DES:!aNULL:!MD5:!DSS:!RC4
  SSLCertificateKeyFile /etc/httpd/tls/wildcard.mwclearning.com.201709.key.pem
  SSLCertificateFile /etc/httpd/tls/wildcard.mwclearning.com.201709.cert.pem
  SSLCertificateChainFile /etc/httpd/tls/wildcard.mwclearning.com.201709.ca.pem
</VirtualHost>
#resart apache
systemctl restart httpd

So now we should have an endpoint that will decrypt and forward https request from port 443 to the swift listener on port 8080.

Updating internal auth

As keystones auth listener is the same for internal and external (vhost) I also updated the internal address to match the FQDN allowing for valid TLS.

Keystone service definitions

mysql -u keystone -h services01 -p
use keystone;
select * from endpoint;
# Updating these endpoints with 
update endpoint set url='https://swift-os.mwclearning.com:8080/v1/AUTH_%(tenant_id)s' where id='579569...';
update endpoint set url='https://api-cbr1-os.mwclearning,com:5000/v3/' where id='637e843b...';
update endpoint set url='http://controller01-int.mwclearning.com:5000/v3/' where id='ec1ad2e...';

Now after restarting the services all is well with TLS!

Categories
Introduction to OpenStack Online Courses

Session 4: Deploying a Virtual Machine from Horizon

After session 3 we have a running OpenStack deployment. Now to deploy a VM.

First off – after starting the OpenStack node I am getting connection refused when trying to connect to Horizon. To check OpenStack services I will follow: https://docs.openstack.org/fuel-docs/latest/userdocs/fuel-user-guide/troubleshooting/service-status.html. These instructions don’t really work for devstack on CentOS but they are a good starting point.

Horizon is dependent on apache so systemctl status httpd revealing apache not running was the first issue. After starting apache I receive an error “cannot import name cinder” when trying to load http://devstack/dashboard. So I need to check the status of the other OpenStack services. As this is a DevStack deployed OpenStack, the service names are not the same as the doc suggests:

[root@devstack ~]# systemctl list-units | grep stack
 devstack@c-api.service    loaded active running
 devstack@c-sch.service    loaded active running
 devstack@c-vol.service    loaded active running
 devstack@dstat.service    loaded active running
 devstack@etcd.service     loaded active running
 devstack@g-api.service    loaded active running
 devstack@g-reg.service    loaded active running
 devstack@keystone.service loaded active running
 devstack@n-api-meta.service loaded active running
 devstack@n-api.service    loaded active running
 devstack@n-cauth.service  loaded active running
 devstack@n-cond-cell1.service loaded active running
 devstack@n-novnc.service  loaded active running
 devstack@n-sch.service    loaded active running
 devstack@n-super-cond.service loaded active running
 devstack@placement-api.service loaded active running
● devstack@q-agt.service   loaded failed failed 
 devstack@q-dhcp.service loaded active running
 devstack@q-l3.service   loaded active running
 devstack@q-meta.service loaded active running
 devstack@q-svc.service  loaded active running
 system-devstack.slice  loaded active active

So I can see that q-agt.service is not running. This is a critical component of Neutron so lets continue troubleshooting by trying to start that service. The service started after running systemctl start devstack@q-agt.service but failed again within a minute or so.

journalctl -u devstack@q-agt.service revealed:

CRITICAL neutron [-] Unhandled error: Exception: Could not retrieve schema from tcp:127.0.0.1:6640: Connection refused
...
ovs|00002|db_ctl_base|ERR|transaction error: {"details":"Transaction causes multiple rows in \"Manager\" table to have identical values (\"ptcp:6640:127.0.0.1\") for index on column \"target\". First ro

A quick google search lead me to: https://ask.openstack.org/en/question/109750/systemd1-devstackq-agtservice-failed/

SELinux… just to confirm I ran a setenforce 0 and start the service again – all is fine. In a proper environment I would not be satisfied with just leaving SELinux disabled… but for the lab I will move on with it disabled. With devstack@q-agt.service running now – Horizon is loading as expected.

So back to the coursework, the objectics of session 4:

  • Describe the purpose and use of tenants, users, and roles.
  • Differentiate between administrative scopes in Horizon.
  • Discuss the different components that are required for deploying instances from Horizon.
  • Deploy an instance from Horizon.

Logging in as as admin we look at the admin interface in Horizon and discuss the separation of tenants via projects, the view of infrastructure and instances. Creating a tenant (project) and a user is then completed… pretty straight forward. Interesting note is that under projects/tenants a ‘service’ project is created by default for the OpenStack services. I can see that cinder, placement, glance, nova and neutron users have been created and added to the service project.

Project Quotas are discussed as a method for limiting the amount of resources a tenant can consume. Creating a user to add to the project is then conducts – providing them with a role, ‘User’ enables them to create VMs networks etc.

What is need to deploy an instance in an OpenStack environment:

  • Compute node (nova)
  • Networking – at least private network (neutron)
  • VM Image (glance)
  • Security – Security Groups (nova)
  • Storage – Cinder

Creating an Instance via Horizon:

  • Configure networking (create a SDN, private + generally attaching floating IPs)
  • Assign floating IP addresses
  • Define a security group in the cloud
  • Create an SSH key pair
  • Create a Glance image
  • Choose a flavor
  • The instance can be booted.

The session runs through these steps in more details. Anyone who has used AWS will be familiar with each step. The only one that  really takes some consideration with this lab environment is the software defined networks. This issue then spilled into my nova service being in accessible thus preventing VMs from being launched. Suffice to say at this point, altering the physical network underlying the whole stack is likely to end badly! I need to get a fuller understanding of how Neutron works with underlying hardware devices and how to reconfigure nova without redeploying the whole devstack.

Categories
Introduction to OpenStack Online Courses

Session 3: Deploying OpenStack (PackStack and DevStack)

Session 3 looks at deploying OpenStack via manual, scripted and large scale methods.

  • Manual component deployments – see https://docs.openstack.org
  • Scripted – PackStack and DevStack are the primary options for scripted deployments of OpenStack
  • Large scale deployment – can be achieved with more advanced solutions such as TripleO, Director and others

In a typical OpenStack deployment there will be a number of node roles. For example:

  • Controller node – Typically the node controlling services (Keystone, Message queue, MariaDB, time servers etc)
  • Network controller node – Providing network services (routing -internal and external, software defined networking)
  • Compute nodes – Hypervisors with Nova agents
  • Storage nodes – Swift / Ceph etc

Of course for demo environment all of these roles may be fulfilled by 1 server.

DevStack is a scripted deployment tool that is ideal for testing and local machine lab environments. The course material is in reference to the Mitaka release of OpenStack which has already been EOLed and is for Ubuntu based servers which will provide less relevance for my CentOS/RHEL work environment. So, I will deviate from the course slightly by using CentOS 7 and the Pike release of OpenStack.

There are some Docker images of DevStack which were tempting but for the purposes of learning decided to stick with a VM. To install DevStack on CentOS 7 i completed the following:

  1. Create a VM on Hyper-V (or whatever) with CentOS 7 minimal (I choose to provide 6GB RAM (4GB aluminum), 2 vCPU, 60GB storage
    1. I also created a Hyper V virtual internal network which enabled static internal IP addresses and an external Hyper V network for internet connectivity
  2. ssh to the VM and download devstack and install via (depending on your internet connection this can take more than 1 hour):

    git clone https://git.openstack.org/openstack-dev/devstack
    cd devstack
    # create local.conf with the following contents:
    #	[[local|localrc]]
    #	ADMIN_PASSWORD=secret
    #	DATABASE_PASSWORD=$ADMIN_PASSWORD
    #	RABBIT_PASSWORD=$ADMIN_PASSWORD
    #	SERVICE_PASSWORD=$ADMIN_PASSWORD
    ./stash.sh
  3. The Horizon interface should now be waiting for you when hitting the VMs IP / Hostname via a browser

Installing an all-on-one VM deployment of OpenStack on CentOS 7 using DevStack took all of about 30 minutes. This was pretty simple and seamless. Later I will need to try installing RDO via the scripted method – PackStack.

Back the course material we take a look at the node roles:

  • Controller node – Keystone, message queue, MariaDB and other critical services. May be 1, 1+n redundancy, n+n were high load is expected.
  • Network node – Providing the software defined networking (Neutron)
  • Compute node – Run the instances (Nova agent + Hypervisor)
  • Storage node – Swift/Ceph

There is a couple of slides now talking specifically about RedHat and CentOS. RDO is the OpenSource version of RedHats OpenStack platform and then a was through of deploying OpenStack on CentOS 7 with PackStack

Categories
Introduction to OpenStack Online Courses

Session 2: Understanding OpenStack

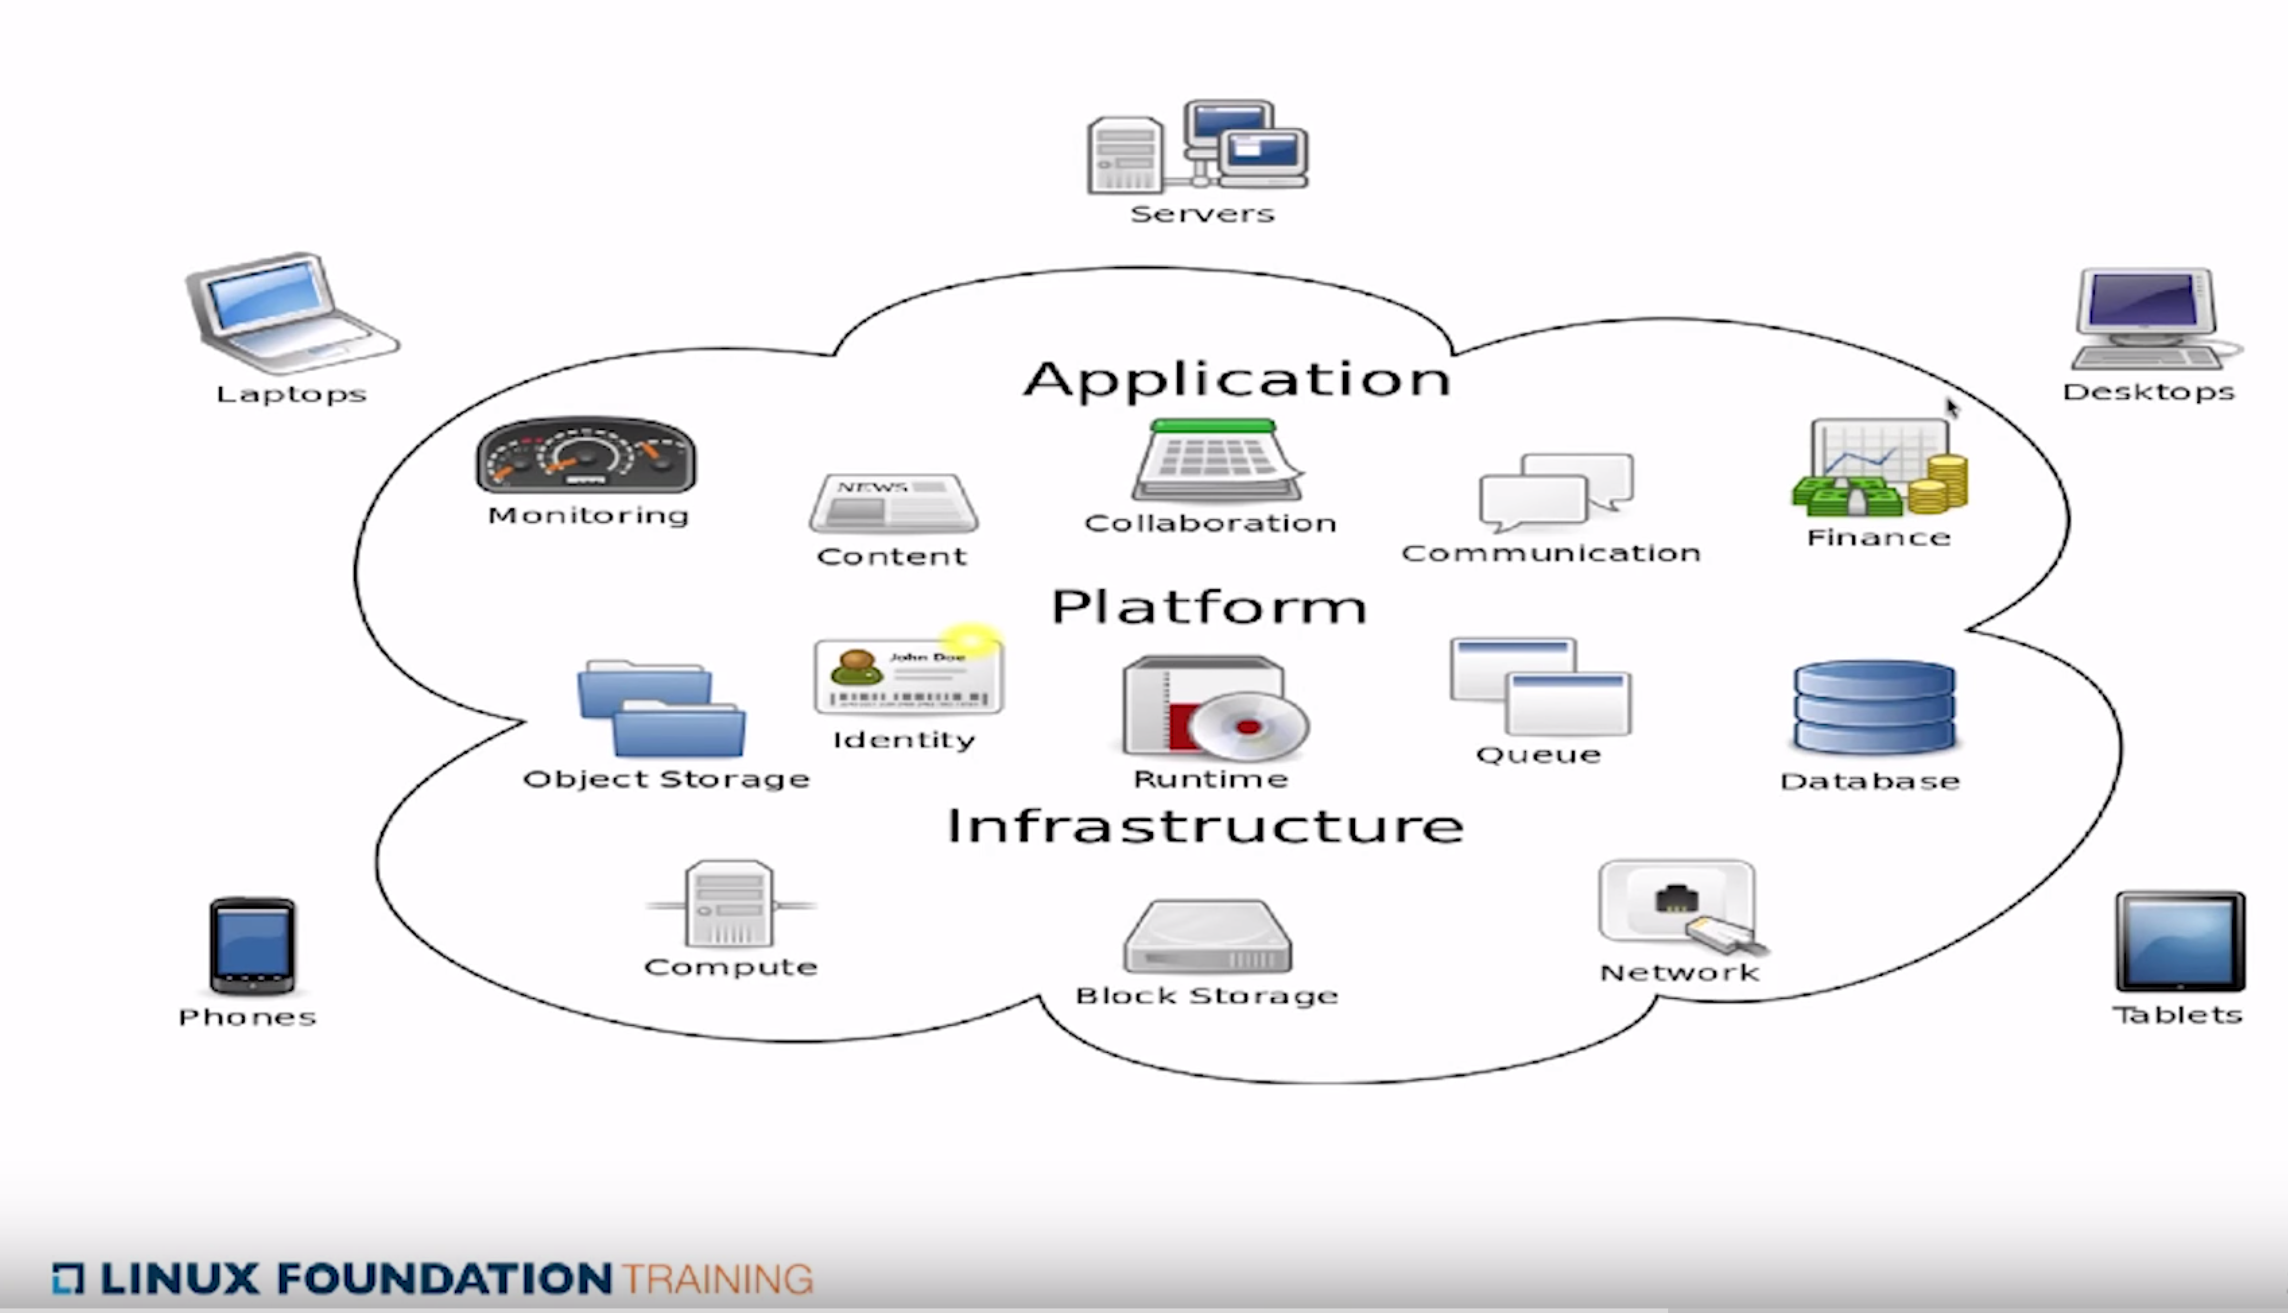
After a pretty basic Session 1, looking forward to focusing in more on OpenStack. We start off with some history and a look at the OpenStack Foundation.

OpenStack started in 2010 as a joint project between RackSpace (providing Swift) and NASA (providing Nova). The role of the OpenStack Foundation is described as:

to promote the global development, distribution, and adoption of the cloud operating system. It provides shared resources to grow the OpenStack cloud. It also enables technology vendors and developers to assist in the production of cloud software.

That’s a bit to abstract for me to understand… but anyway.. also mentioned is information on how to contribute and get help with OpenStack. I think https://ask.openstack.org/en/questions/ will come in very handy. As OpenStack is a community project hopefully I can find something to contribute here – https://wiki.openstack.org/wiki/How_To_Contribute.

We know start looking at the OpenStack Projects. Being aware of these projects and their maturity status is critical for operating an OpenStack deployment effectively.

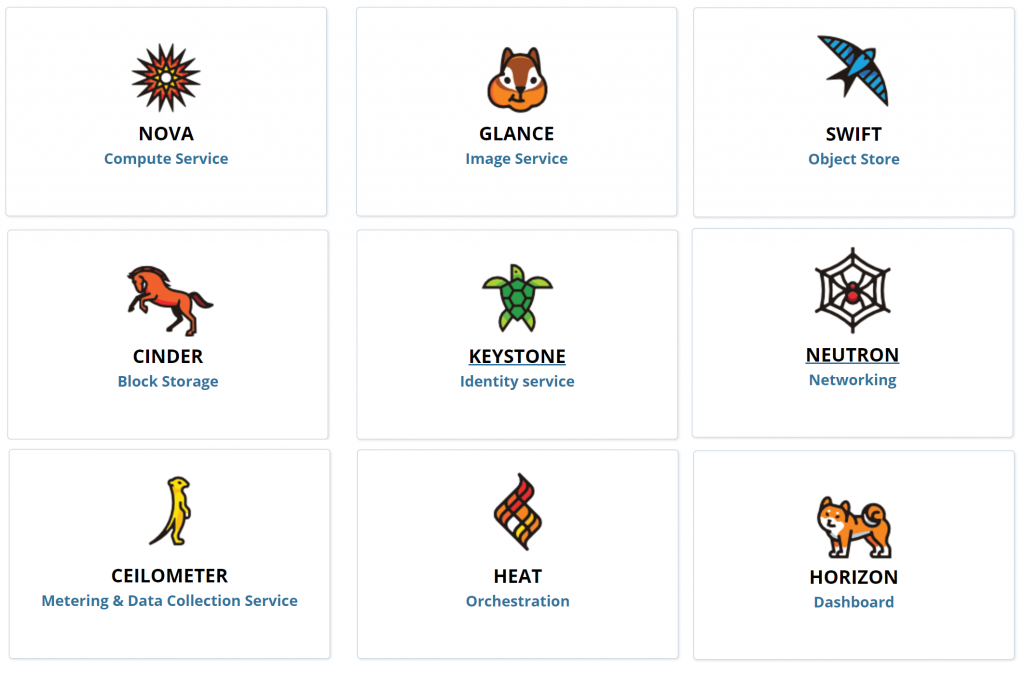
Core OpenStack Projects

There are some other project that have high adoptions rates (>50% of OpenStack deployments):

  • Heat – Orchestration of Cloud Services via code (text definitions) and also provides auto-scaling ala AWS CloudFormation
  • Horizon – OpenStack’s dashboard with web interface
  • Ceilometer – Metering and data collection service enabling metering, billing, monitoring and data driven operations

Other projects introduced in this session:

  • Trove – Database as a Service (ie: AWS RDS)
  • Sahara – Hadoop as a Service
  • Ironic – Bare metal provisioning (very good name!)
  • Zaqar – Messaging service with multi tenant queues, high availability, scalability, REST API and web-socket API
  • Manila – Shared File System service – Like running samba in the cloud
  • Designate – DNS as a Service (backed by either Bind or PowerDNS) – also integrates with Nova and Neutron for auto-generation of DNS record
  • Barbican – Secret and Key management
  • Magnum – Aims to enable the usage of Swarm, Kubernetes more seamlessly in OpenStack
  • Murano – Application catalogue
  • Congress – Policy as a Service

After introducing these core services the session delves into a little more detail on the key.

Nove Compute is arguably the most important components. It manages the lifecycle (spawning, scheduling and decommissioning) of all VMs on the platform. Nova is not the hypervisor, it interfaces to the hypervisor you are  using (Xen, KVM, VMware, vSphere) via an agent that is installed on the hypervisor. Nova should be deployed in a distributed fashion where some agents run at local work points and some server processes run on the management servers.

Neutron Networking allows users to define their own networking between VMs they have deployed. Two instances may be deployed on 2 separate physical clusters but the user wants the on the same subnet and broadcast network. Though this can’t be done at the physical level, Neutron’s software defined network enable a logical network to be define which transparently configures the underlying network infrastructure to provide that experience to the user. Neutron uses a pluggable architecture meaning most vendors will enable Neutrons SDNs. Neutron has an API that allows networks to be defined and configured.

Swift Object Storage provides highly scalable storage. It is analgous to AWS’s S3 service. Applications running on OpenStack can talk to a swift proxy which stores the data provided to them on multiple storage nodes. This makes it very fault tolerant. The swift proxy is able to make many parallel requests to storage nodes making scalability quite easy. The swift services can be interfaced with via a RESTful api.

Glance Image provides the ability to store virtual disk images. Glance should use Swift/Ceph as a scalable backend for storing the images. A list of ready to download images can be found here: https://docs.openstack.org/image-guide/obtain-images.html – Windows images are available (supported with Hyper-V and KVM hypervisors). An example of deploying an image to Glance (when using KVM):

gunzip -cd windows_server_2012_r2_standard_eval_kvm_20170321.qcow2.gz | 
glance image-create --property hypervisor_type=QEMU --name "Windows Server 2012 R2 Std Eval" 
--container-format bare --disk-format qcow2 --property os_type=windows

Cinder Block Storage is, in essence, the same as AWS Elastic Block Storage [EBS] whereby persistent volumes can be attached to VMs. Cinder can use Swift/Ceph (or linux LVM) as a backend for storage. Instance storage, without Cinder Block Storage is ephemeral.

Keystone Identity provides authentic and authorization services for OpenStack services. Keystone also provides the central repository for available services and their end points. Keystone also enables definition of Users, Roles that can be assigned to Projects (Tenants). Keystone uses MariaDB by default but can use LDAP (not sure if a DB backend is still required in that case).

Behind the core OpenStack services above – there are some other critical services (dependencies):

  • Time synchronization – OpenStack services depend on this for communication, in particular Keystone issues access tickets that are tied to timestamps
  • Database – MariaDB (by default) for Keystone is a critical services
  • Message Queue – Enable message passing between services – which given the RESTful communications is again critical

Following on from the brief overview of key components of OpenStack we look at the RESTful api – basically just stating that HTTP with JSON is prevalent. If one wanted to basically all OpenStack operations could be complete with cURL.

Horizon is the introduced as a web-based GUI alternative to using the RESTful APIs or the command line client. The command line client  can be configure to point to Keystone from which it will discover all the other available services (Nova, Neutron, Swift, Glance etc). The Horizon Dashboard distinguished between Administrators and Tenants but based on our initial testing.

That’s a wrap for, Session 3 we will start deploying OpenStack!

Categories
Introduction to OpenStack Online Courses

Session 1: From Virtualization to Cloud Computing

In looking for an online, at your own pace course for getting a foundation understanding of OpenStack I came across edx.org’s OpenStack course (LFS152x). The full syllabus can be downloaded here.

Out of this course I hope to get an understanding of:

  • The key components of OpenStack
  • Hands on experience via some practical work
  • A local lab environment for further learning
  • Some resources that I can go back to in the future (ie: best forums)
  • The history and future of OpenStack
  • The next steps for building expertise with OpenStack

The course kicks off in Session 1 with a bunch of introductory information (including a page or so on The Linux Foundation who run more project I use than I was aware).

After the introductory items we go over the evolution from physicals servers to virtualization to cloud and why each step has been take… which really boils down to efficiency and cost savings.

  • Physical servers suck because they take up space and power and are difficult to properly utilize (physical hosts alone generally operate at < 10% capacity)
  • Virtualization lacks self-service
  • Virtualization has limited scalability as it is manual
  • Virtualization is heavy -> every VM has its own kernel
  • Containers are better than VMs by visualizing the operating system (many OS to 1 kernel)
  • Containers are also good because they remove a number of challenges along the deployment/development pipeline

Interestingly this introductory seems to focus in on containerization, describing what container images as the Application, User Space dependencies and Libraries required to run. Every running container has 3 components:

  1. Namespaces (network, mounts, PIDs) – provide isolation for processes in the container
  2. CGroups – reserve and allocate resources to containers
  3. Union file system – merge different filesystems into one, virtual filesystem (ie: overlayfs)

Some pros and cons of containers are discussed –  I am not sure about the security pros – versus VMs but I think the value provided by containerization has been well established.

Next up is some discussion on Cloud Computing. Though a lot of this stuff is fairly basic, its nice to review every now and then. The definition provided for Cloud Computing:

Cloud computing is an Internet-based computing that provides shared processing resources and data to computers and other devices on demand. It enables on-demand access to a shared pool of computing resources, such as networks, servers, storage, applications and services, which typically are hosted in third-party data centers.

The differences between IaaS, PaaS and SaaS are covered, a decent diagram to spot the differences (with Application representing the Software as a Service category):

A great point mention is that “If you do not need scalability and self-service, you might be better off using virtualization.” – which in my experience is very true. For some clients the added complexity that comes with enabling self service and dynamic scalability are not used and the stability and relative simplicity of static virtual machines is a better solution.

We then run through an example of deploying a VM on AWS… with the conclusion that OpenStack is about the same and has a more developed API (not sure about that yet!).

Will move on to Session 2 and hopefully start digging into OpenStack more specifically!

Categories
Online Courses Scalable Microservices with Kubernetes

Deploying Microservices

So far the Kubernetes examples have been little more than what could be accomplished with Bash, Docker and Jenkins. No we shall look at how Kubernetes can be used for more effective management of application deployment and configuration. Enter Desired State.

Deployments are used to define our desired state then work with replica controllers to ensure desired state is met. A deployment is an abstraction from a pods.

Services are used to group pods and provide an interface to them.

Scaling is up next. Using the deployments configuration file updating the replicas field and running kubectl apply -f <file> is all that needs to be done! Well its not quite that simple. That scales the number of replica pods deployed to our kubernetes cluster. It does not change the amount of machine (VM/Physical) resources in the cluster. So… I would not really call this scaling :(.

Onto updating (patching, new version etc). There are two types of deployments, rollout and blue-green. Rollouts can be conducted by updating the deployment config (container->image) reference then running kubectl apply -f. This will automatically conduct a staged rollout.

OK so that’s the end of the course – it was not very deep, and did not cover anything like dealing with persistent layers. Nonetheless it was good to review the basics. Next step is to understand the architecture or our my application running on Kubernetes in AWS.

At first I read a number of threads stating that kubernetes does not support cross availability zone clusters in AWS. Cross availabilty zone clusters are supported on AWS: Kube-aws supports “spreading” a cluster across any number of Availability Zones in a given region. https://coreos.com/kubernetes/docs/latest/kubernetes-on-aws-render.html. With that in mind the following architecture is what I will be moving to:

kubernetes high level architecture
Kubernetes high level architecture

Instead of HA Proxy I will stick with out existing NGINX reverse proxy.

Categories
Online Courses Scalable Microservices with Kubernetes

Introduction To Microservices and Containers with Docker

After running through some unguided examples of Kubernetes I still don’t feel confident that I am fully grasping the correct ways to leverage the tool. Fortunately there is a course on Udacity that seems to be right on topic…Scalable Microservices with Kubernetes.

The first section, Introduction to Microservices references a number of resources including The Twelve-Factor App which is a nice little manifesto.

The tools used in the course are:

  • Golang – A newish programming language from the creators for C (at Google)
  • Google cloud shell – Temp VM preloaded with the tools need to manage our clusters
  • Docker – to package, distribute, and run our application
  • Kubernetes – to handle management, deployment and scaling of application
  • Google Container Engine – GKE is a hosted Kubernetes service

The Introduction to Microservices lesson goes on to discuss the benefits for microservices and why they are being used (boils down to faster development). The increased requirements for automation with microservices are also highlighted.

We then go on to set up GCE (Google Compute Engine), creating a new Project and enabling the Compute Engine and Container Engine APIs. To manage the Google Cloud Platform project we used the Google Cloud Shell. On the Google Cloud Shell we did some basic testing and installation of GoLang, I am not sure what the point of that was as the Cloud Shell is just a management tool(?).

Next step was a review of

All pretty straight forward — On to Building Containers with Docker.

Now we want to Build, Package, Distribute and Run our code. Creating containers is easy with Docker and that enables us to be more sure about the dependencies and run environment of our microservices.

Part 1 – Spin up a VM:

# set session zone
gcloud config set compute/zone asia-east1-c
# start instance
gcloud compute instances create ubuntu \
--image-project ubuntu-os-cloud \
--image ubuntu-1604-xenial-v20160420c
# login
gcloud compute ssh ubuntu 
# note that starting an instance like this make is open to the world on all ports

After demonstrating how difficult it is to run multiple instances/versions of a service on an OS the arguments for containers and the isolation they enable we brought forth. Process(kind of), Package, Network, Namespace etc. A basic Docker demo was then conducted, followed by creating a couple of Dockerfiles, building some images and starting some containers. The images where then pushed to a registry with some discussion on public and private registries.